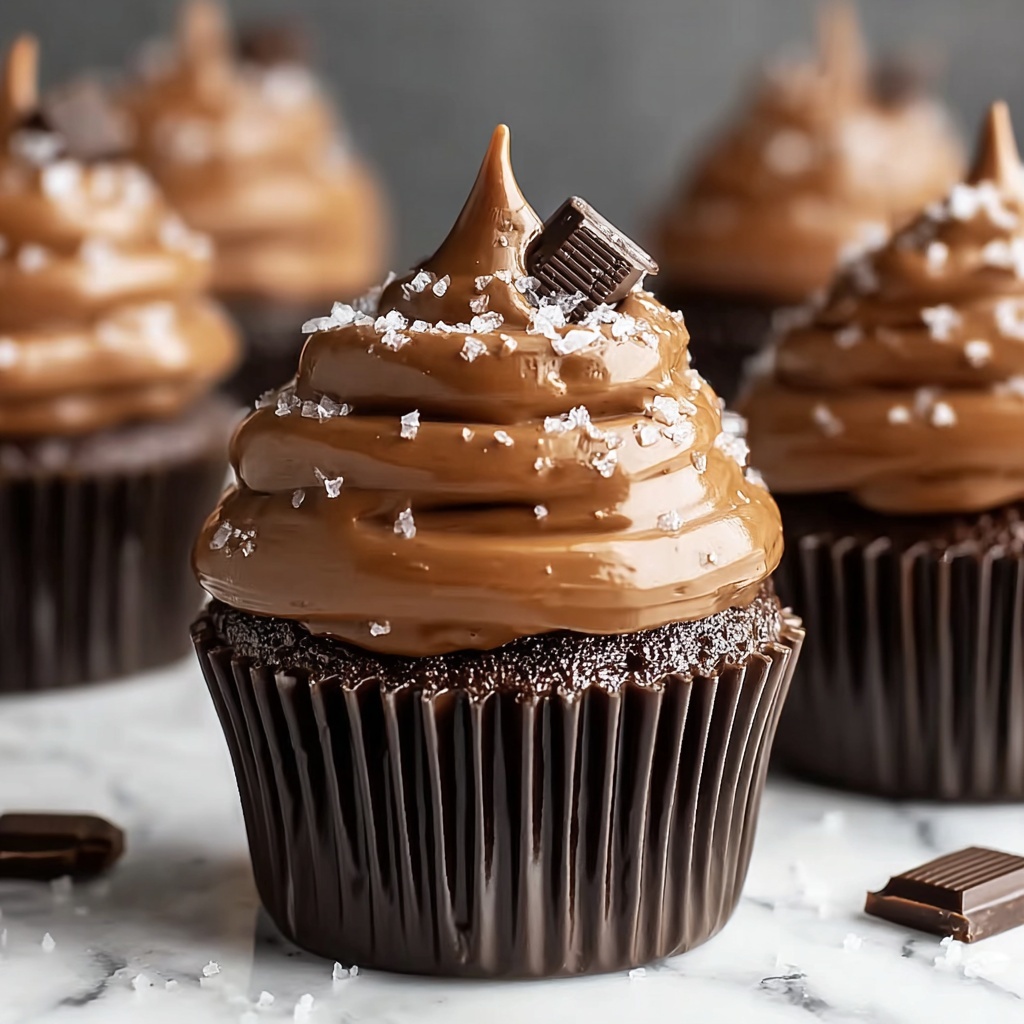
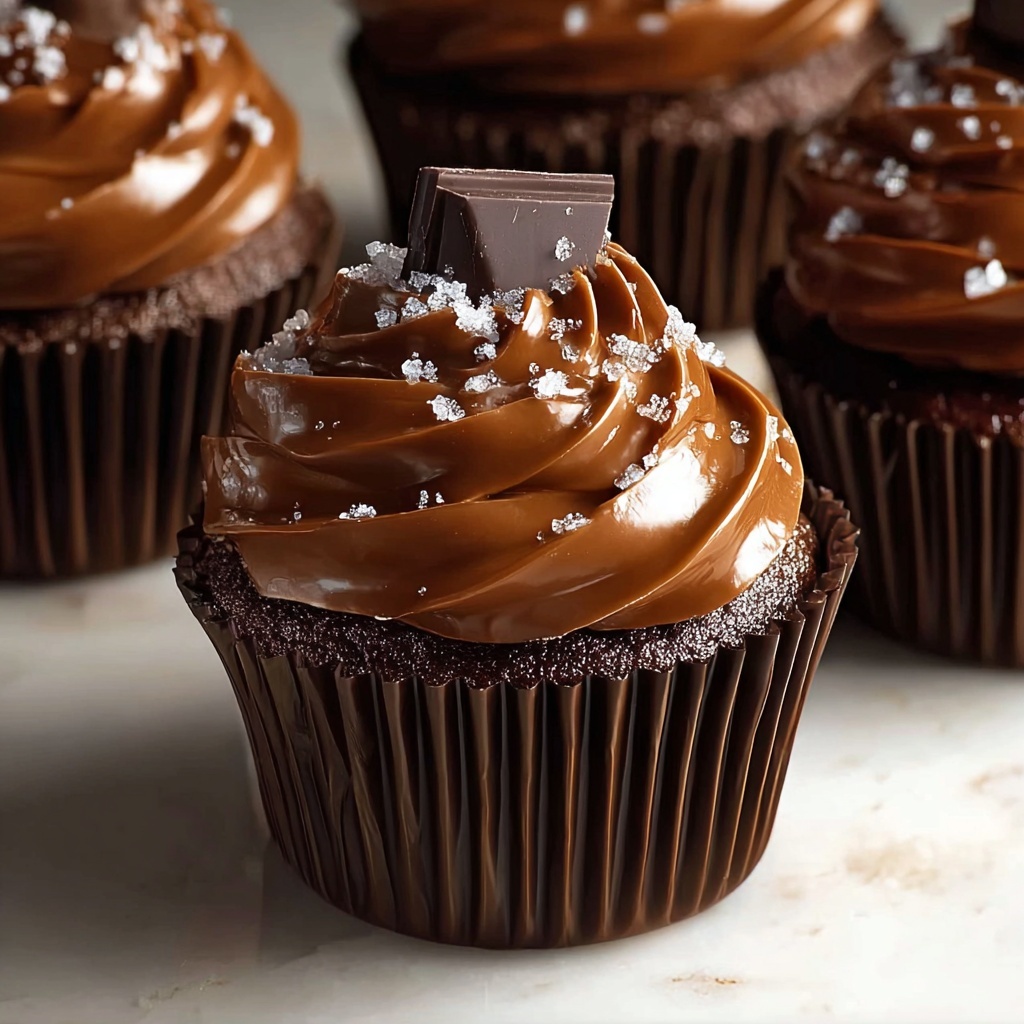
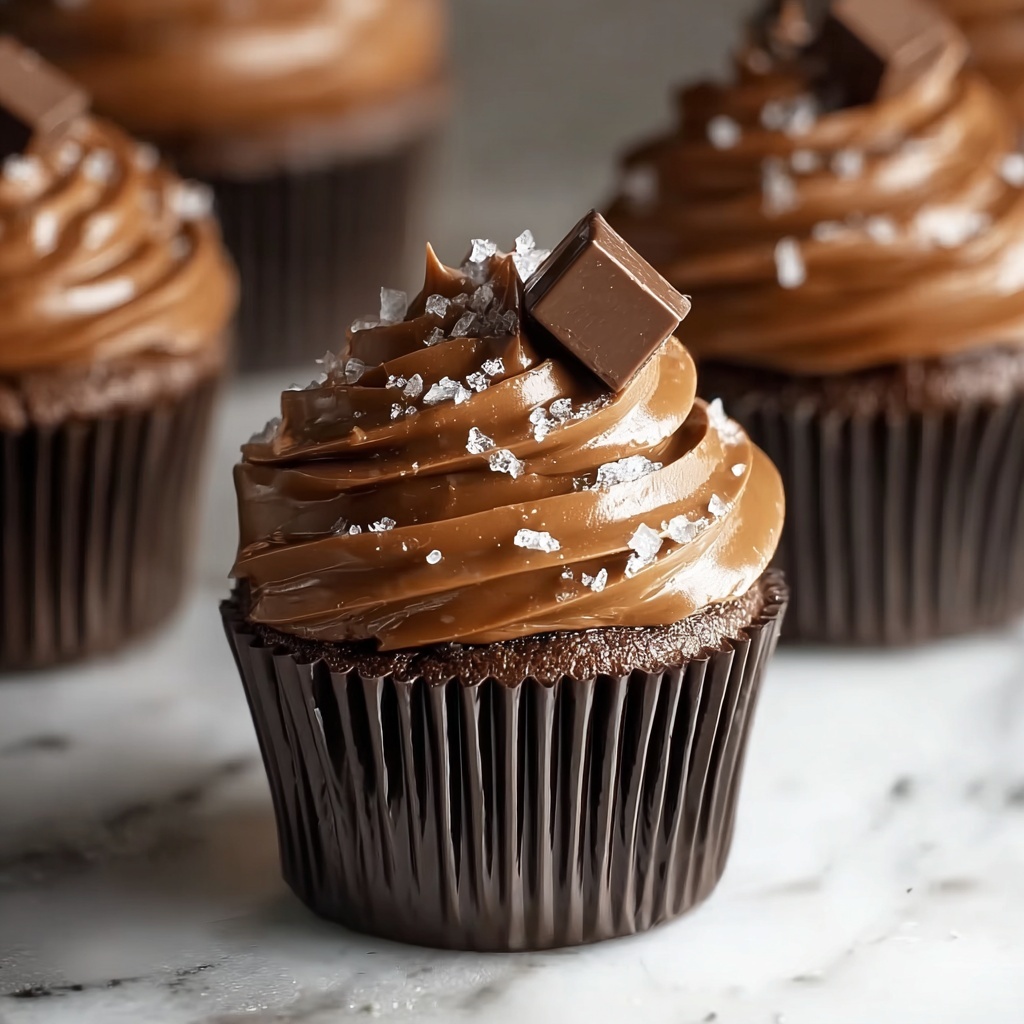
There is something truly special about a dessert that combines rich chocolate, smooth mousse, and the delicate balance of salted caramel. These Salted Caramel Chocolate Mousse Cups Recipe have a texture that feels like silk melting in your mouth, paired with the creamy, luscious layers that keep you coming back for more. Whether you’re crowning your dinner party or craving an indulgent treat on a quiet evening, these petite cups offer a perfect balance of sweetness and a gentle hit of salt, making each bite unforgettable. If you adore desserts that feel both elegant and comforting, you will want to set aside a few hours and dedicate yourself to making this today.
Chocolate mousse itself has a long-standing history in French cuisine, symbolizing elegance and refined taste. Traditionally served in delicate glassware or small bowls, mousse desserts are known for their light yet rich consistency. Adding salted caramel to this dessert has become increasingly popular over the years, especially in cafes and patisseries around the world. The salt accentuates the sweetness and depth of both the caramel and chocolate, perfecting the harmony between flavors. For many, this combination recalls fond memories of festive gatherings or cozy nights by the fire, proudly sharing something crafted with care and love.
By following this Salted Caramel Chocolate Mousse Cups Recipe, you won’t just be creating any ordinary dessert. You will learn the technique behind crafting chocolate cups that encase the mousse and the art of making both the mousse and salted caramel from scratch. What makes this version distinctive is the balance of textures: the sturdy chocolate shell, the airy mousse, and the luscious drizzle of caramel salted just right. Each step is carefully explained so you can build confidence and enjoy the process. Once you get the hang of it, these cups promise to become a favorite way to impress guests or treat yourself.
Why You’ll Love This Salted Caramel Chocolate Mousse Cups Recipe
This recipe truly shines because it is surprisingly approachable despite its gourmet feel. The preparation may require some patience, but each stage is straightforward and broken down into manageable steps. From melting chocolate to whisking egg yolks and sugar, to creating the salted caramel sauce, the techniques are classic yet very doable. Even if you consider yourself a novice, the instructions guide you clearly, making each phase enjoyable rather than stressful.
Another wonderful aspect is how well these cups please a crowd. Their individual serving size makes them perfect for sharing at holidays, birthdays, or any celebration. Guests will appreciate the attention to detail and the beautiful presentation, which immediately elevates the sense of occasion. Because they can be prepared ahead of time and refrigerated, hosting becomes easier, freeing you up to spend more time with loved ones rather than fussing in the kitchen.
Versatility speaks loudly here as well. While the chocolate foundation is rich and smooth, the salted caramel layer adds an unexpected dimension that can be adjusted slightly to suit your preference for sweetness or saltiness. This Salted Caramel Chocolate Mousse Cups Recipe works wonderfully for a variety of occasions—from casual get-togethers to formal dinners. Making it at home also lets you customize every ingredient, ensuring the freshest quality and richer taste compared to anything store-bought or ordered out.
Ingredients You’ll Need
The magic of this recipe lies in a few hero ingredients, each playing a vital structural and flavor role. Chocolate chips or chopped chocolate form the sturdy base and outer shell of the cups, providing that satisfying snap and strong chocolate presence. Egg yolks serve as the foundation of the mousse, giving it a silky, custard-like richness, while granulated sugar sweetens without overwhelming. Heavy cream is essential not only for the mousse but also for the silky texture of the caramel. The salted butter in the caramel adds depth and that essential savory note, while vanilla extract brings out the complexity of all these flavors.
Alongside these, pantry staples such as granulated sugar and light corn syrup work their magic in the caramel-making process. If corn syrup is unavailable, a combination of honey and water can be experimented with, though the texture might vary slightly. When choosing your chocolates, dark, milk, or semi-sweet will work, but quality matters for the best flavor. For the finishing touches, chocolate curls or shavings and coarse salt add both visual appeal and texture contrast, enhancing the final experience of the mousse cups.
- Chocolate chips or chopped chocolate (1 cup for cups, 1 cup for mousse): This ingredient forms the chocolate shell and the main chocolate flavor in the mousse. When selecting chocolate, opt for good quality bars or chips to ensure smooth melting and rich flavor. Avoid low-quality chocolate that contains fillers which can affect texture.
- Egg yolks (4): Egg yolks add richness and help create the creamy texture of the mousse by binding the ingredients together. Use fresh, high-quality eggs for the best taste and safety, and be sure to whisk them thoroughly with the sugar for a smooth custard base.
- Granulated sugar (¼ cup for mousse, ½ cup for caramel): Sugar sweetens both the mousse and the caramel, balancing bitterness from the chocolate and enhancing flavors. When making caramel, even heating of sugar is essential to avoid burning and bitterness, so keep a close eye during cooking.
- Heavy cream (2 cups total): Heavy cream is the backbone of mousse texture and luscious caramel. Divide it to use half for the custard and half for whipping, ensuring the mousse is airy and smooth. For whipping, ensure the cream is chilled fully before use for best volume.
- Vanilla extract (1 teaspoon): Vanilla brings all the flavors together with its aromatic warmth. Use pure vanilla extract instead of imitation for depth.
- Salted butter (3 tablespoons): This adds necessary richness to the caramel and helps balance its sweetness with a salty note. Make sure to use unsalted butter if possible, since salt is added separately and coarse salt is sprinkled on top for finishing; otherwise, control your salt quantities carefully.
- Light corn syrup (2 tablespoons): Keeps the caramel smooth and prevents sugar crystallization. If unavailable, use honey sparingly but be aware it might alter flavor slightly.
- Coarse salt (a pinch plus for garnish): Coarse salt on top enhances the salted caramel effect by providing a surprise crunch and a flavor contrast. Kosher salt works perfectly for texture and visual appeal.
- Chocolate curls or shavings (to garnish): Adds elegance and texture contrast on top of the final mousse cups. Create these from leftover chocolate with a vegetable peeler or purchase pre-made ones for convenience.
- Muffin liners: Essential for shaping the chocolate into cups easily. Jumbo or regular size liners can be used depending on desired cup size.
How to Make Salted Caramel Chocolate Mousse Cups Recipe
The process of making these Salted Caramel Chocolate Mousse Cups involves several steps that combine to create a beautiful finished dessert. From forming the chocolate cups to preparing a smooth chocolate mousse and silky salted caramel, each stage requires care and attention to detail. The key to success is taking your time, especially when melting chocolate and cooking the custard base, as rushing can lead to grainy or broken textures. But if you follow the steps carefully, you will be rewarded with a dessert that is elegant, creamy, and indulgently satisfying.
Step 1: Crafting the Chocolate Cups
Start by melting 1 cup of chocolate chips or chopped chocolate gently in the microwave at 50% power. Stir every 30 seconds to ensure the chocolate melts evenly and does not burn. The goal is a glossy, smooth liquid without lumps. Once melted, line a muffin tin with muffin liners, and spoon 1½ tablespoons of melted chocolate into each, using the back of the spoon to spread it up the sides, creating a thick, even coat. This layer forms the sturdy shell that will hold the mousse and caramel. Be careful not to apply too thin a layer or the cups may crack when removed. Allow these to harden fully at room temperature or in the fridge before peeling the liners away gently and setting the cups aside.
Step 2: Whisking the Egg Yolk Mixture
Combine the 4 egg yolks with ¼ cup of granulated sugar in a bowl, whisking vigorously until the mixture is smooth and pale. This step is important because it dissolves the sugar into the yolks evenly and creates a base for your rich custard. A common pitfall here is to rush the whisking, which might leave grainy sugar unincorporated. Whisk long enough until you feel the texture is velvety and the color lightens to almost a creamy yellow. Proper mixing ensures the dessert’s texture will be silky and smooth.
Step 3: Heating the Cream and Combining
In a saucepan, gently heat 1 cup of heavy cream with 1 teaspoon vanilla extract and a pinch (⅛ teaspoon) of salt until steaming hot but not boiling. This temperature softens the egg yolks without scrambling them. Gradually whisk half of this hot cream into the egg yolk and sugar mixture in a slow stream, tempering the eggs and preventing them from curdling. Then pour the entire mixture back into the saucepan. Cook the combined custard over low heat, stirring constantly until it thickens and reaches 170°F. This precise temperature is crucial; below it the custard will be too thin, and above it the yolks might scramble. Use a thermometer to be accurate, and don’t leave it unattended.
Step 4: Melting Chocolate into Custard and Chilling
Remove the custard from heat and stir in 1 cup of chocolate chips or chopped chocolate until fully melted and smooth. This completes the mousse base, infusing it with deep chocolate flavor and creating a rich texture. Allow the chocolate custard to cool slightly, then chill it in the refrigerator for 1 to 2 hours until fully cold. Proper chilling helps the mousse develop structure for the next step of folding in whipped cream. Rushing this chilling period can lead to runny mousse which lacks the ideal fluffy texture.
Step 5: Whipping Cream and Folding into Chocolate Mixture
While the chocolate custard chills, whip the remaining 1 cup of heavy cream to stiff peaks. This creates the airy element of the mousse. Stiff peaks mean that when you lift the whisk, the cream holds its shape fully without drooping. Gently fold the whipped cream into the chilled chocolate custard using a spatula, being careful not to deflate the air. This technique maintains the mousse’s lightness while ensuring it is well combined. The result is the signature fluffy yet rich mousse that melts in your mouth.
Step 6: Preparing Salted Caramel and Assembling Cups
Create the salted caramel by cooking ½ cup sugar and 2 tablespoons light corn syrup in a saucepan over medium heat until the mixture turns a deep amber color. This step demands your attention as the sugar can go from perfectly caramelized to burnt quickly. Once amber, carefully add 3 tablespoons salted butter and ⅓ cup heavy cream, whisking continuously to incorporate and smooth the sauce. Stir in ¼ teaspoon salt and 1 teaspoon vanilla extract, enhancing the complex flavor. Remove from heat and let cool slightly. To assemble, spoon a layer of caramel into each hardened chocolate cup, followed by a generous layer of chocolate mousse. Drizzle additional caramel on top, then finish with a sprinkle of coarse salt and chocolate curls. Refrigerate the completed cups for at least 4 hours to set fully before serving, allowing the layers to meld beautifully.
Pro Tips for the Best Salted Caramel Chocolate Mousse Cups Recipe
Tip 1: Temper Eggs Carefully
Tempering the eggs with hot cream is essential to prevent scrambling and curdling. Pour the hot cream slowly into the egg yolks while whisking constantly for a smooth custard. This step ensures your mousse has a silky texture rather than grainy bits that can ruin the experience.
Tip 2: Use a Candy Thermometer
A reliable candy thermometer is a worthwhile investment for precise temperature control when making the custard and caramel. Knowing when the custard reaches exactly 170°F or when the caramel turns deep amber guarantees success and avoids common pitfalls like burning or overcooking.
Tip 3: Chill the Mousse Thoroughly
Allow enough time for the mousse to chill in the refrigerator before folding cream in and assembling the cups. A fully chilled custard mixture holds shape better and prevents the mousse from becoming runny or separating once mixed.
Tip 4: Choose High-Quality Chocolate
Using good quality chocolate chips or bars greatly improves the flavor and texture of both the cups and mousse. Avoid low-grade chocolates with vegetable fats or excessive fillers since these can affect melting and overall taste in noticeable ways.
Variations and Substitutions
Make It Vegetarian
This Salted Caramel Chocolate Mousse Cups Recipe is already vegetarian except for the eggs within the mousse. For a vegetarian version without eggs, consider using silken tofu blended with melted chocolate as a mousse base. This will change the texture slightly towards a denser creaminess but still offers a luscious experience. Many home cooks enjoy this alternative for its health benefits and ease of preparation.
Make It Spicy
For those who enjoy a subtle heat alongside sweet flavors, adding a pinch (about ¼ teaspoon) of cayenne pepper or a small diced fresh chili into the caramel step creates a warming backdrop to the dessert. Adjust the spice carefully and taste as you go since too much heat can overpower the delicate chocolate and caramel flavors. A light dusting of chili powder on top before serving can also add an unexpected and pleasant touch.
Protein Swaps
Although this dessert is centered on eggs and dairy, if you want to explore protein variations in your diet elsewhere, consider options like Greek yogurt or mascarpone cheese when substituting in desserts generally. Here, replacing egg yolks is tricky as they provide structure, but tofu or aquafaba can provide alternative proteins for mousse-like desserts. Always test cook times and textures carefully when swapping, as the cooking and chilling requirements may shift.
Dietary Modifications
To adapt this recipe for gluten-free diets, no changes are necessary as no gluten-containing ingredients are included. For low-sodium adaptations, reduce or omit the added salt and replace salted butter with unsalted butter, then adjust the coarse salt garnish or omit it entirely. For dairy-free versions, swap heavy cream with coconut cream and use dairy-free chocolate varieties, but note the texture will slightly differ. These substitutions allow greater accessibility without losing the recipe’s essence.
How to Serve Salted Caramel Chocolate Mousse Cups Recipe
Garnishes
Consider topping your mousse cups with chocolate curls or shavings which add a sophisticated visual appeal by catching light and creating a texture contrast. Sprinkling coarse kosher or sea salt on top not only highlights the salted caramel notes but also provides a satisfying crunch with each bite. Toasted chopped hazelnuts or crushed pretzels make for another wonderful garnish option, bringing nutty or savory counterpoints that complement the sweet and creamy elements beautifully.
Side Dishes
Serving these mousse cups alongside fresh berries such as raspberries or strawberries adds a bright, tart note that balances the richness of the chocolate and caramel. A simple mint leaf placed beside each cup creates a refreshing aroma and pop of color. Lightly brewed coffee or espresso is a classic pairing, cutting through sweetness with its bitter complexity. For celebrations, a crisp glass of sparkling water with a slice of lemon offers a palate cleanser to refresh between bites.
Creative Presentation Ideas
For a cozy weeknight dessert, serve these mousse cups in simple white muffin liners placed on a colorful plate for casual charm. At a dinner party, present the cups on a tiered dessert stand with gold or silver liners for an elegant visual impact that impresses guests. For potlucks or informal gatherings, use clear plastic cups with layers distinctly visible — this not only looks inviting but simplifies transport and serving. Each option suits a different vibe while showing these mousse cups off beautifully.
Make Ahead and Storage
Storing Leftovers
Store any leftover mousse cups in an airtight container in the refrigerator. Glass containers with a tight-sealing lid work best to preserve freshness and prevent absorbing any other fridge odors. Properly stored, they keep well for up to three days without a noticeable change in texture or flavor. If the cups soften slightly, chilling them again briefly before serving can restore firmness.
Freezing Instructions
For longer storage, mousse cups can be frozen by placing them in a single layer on a baking sheet and flash freezing until solid, then transferring to a freezer-safe container or resealable bag free of air. They keep well frozen for up to one month. To thaw, place in the refrigerator overnight to slowly come back to perfect serving temperature and texture. Avoid thawing at room temperature as the chocolate cups may soften excessively.
Reheating Methods
This dessert is best served chilled and is not typically reheated. However, if you want to soften the chocolate cups slightly for ease of cutting or serving, use low heat settings. For example, briefly warming in a 200°F oven for 5 minutes can soften the chocolate gently without melting. Avoid microwaving directly as it can cause uneven heating and melting. Stovetop reheating of the mousse is not recommended as it compromises texture.
FAQs About Salted Caramel Chocolate Mousse Cups Recipe
Can I use store-bought caramel sauce instead of making salted caramel?
Yes, you can substitute store-bought caramel sauce for the homemade salted caramel to save time. However, homemade caramel brings a fresher flavor and allows you to control the balance of sweetness and saltiness. When using store-bought, pick a high-quality brand and sprinkle a pinch of coarse salt on top to enhance the salt contrast.
What is the best type of chocolate to use for this recipe?
High-quality semi-sweet, milk, or dark chocolate chips or chopped bars are all suitable. The best choice depends on your preference for sweetness and bitterness. Aim for chocolate with a cocoa content between 50 and 70 percent for a balanced flavor that is rich but not overly bitter. Avoid chocolate with added vegetable oils or low cocoa content as they can affect melting and mousse smoothness.
Is it safe to use raw egg yolks in the mousse?
This recipe cooks the egg yolks gently with hot cream until reaching 170°F, which ensures they are safe to consume. Cooking the yolks also thickens the custard base, contributing to the mousse’s creamy texture. Be sure to measure temperature accurately and stir continuously to avoid scrambling, maintaining both safety and smoothness.
Can I make the chocolate cups in advance?
Absolutely, you can prepare the chocolate cups a day or two ahead and store them in an airtight container at room temperature. This saves time on the day you assemble the mousse cups. Just handle them carefully after removing the liners as they can become fragile if not stored properly.
How long should I chill the mousse before assembling?
Chilling the mousse base for 1 to 2 hours until fully cold is important before folding in whipped cream. This resting period ensures the mousse hold its shape and incorporates air evenly. Rushing this step may result in a runny or less stable mousse.
What can I do if my caramel crystallizes?
If your caramel crystallizes, it becomes grainy and loses smoothness. To avoid this, stir the sugar and corn syrup only in the early stages and avoid stirring once it starts boiling. If crystallization occurs, you can try gently reheating with a splash of water to dissolve sugar crystals, but making a new batch is often better for consistent results.
Are chocolate curls necessary?
Chocolate curls are optional but add an elegant finishing touch and a decorative texture contrast atop the mousse cups. They can be made easily by shaving a chocolate bar with a vegetable peeler. Without them, the dessert still tastes wonderful but lacks a polished appearance that makes it special for occasions.
Final Thoughts
This Salted Caramel Chocolate Mousse Cups Recipe is a stunning example of how simple ingredients can come together to create an indulgent dessert that is both sophisticated and comforting. The balance between silky mousse, rich chocolate cups, and luscious salted caramel is satisfying and well worth the time invested. It is the kind of recipe that can become a household favorite, offering an impressive finish to any meal that guests and family remember fondly. The hands-on process also adds the joy of making something truly homemade.
I encourage you to try this recipe for yourself and see how rewarding the experience can be. Whether you serve it for a special evening or treat yourself on a quiet weekend, these Salted Caramel Chocolate Mousse Cups offer a taste and texture combination that feels both luxurious and familiar. Don’t forget to share your results and come back often for more recipes that celebrate the art and pleasure of home cooking.
Print
- Prep Time: 30 minutes
- Cook Time: 20 minutes
- Total Time: 50 minutes
- Yield: 6 servings
- Category: Dessert
- Method: Stovetop
- Cuisine: American
- Diet: Vegetarian
Description
Indulge in these elegant Salted Caramel Chocolate Mousse Cups featuring crisp chocolate shells filled with a luscious chocolate mousse layered with rich homemade salted caramel. Perfectly balanced with a hint of sea salt and topped with chocolate curls, this dessert is a showstopper for any occasion.
Ingredients
Chocolate Cups
- 1 cup (6 oz) chocolate chips or chopped chocolate
- Muffin liners (jumbo or regular)
Chocolate Mousse
- 4 egg yolks
- ¼ cup granulated sugar
- 2 cups heavy cream, divided
- 1 teaspoon vanilla extract
- ⅛ teaspoon salt
- 1 cup chocolate chips or chopped chocolate (dark, milk, or semi-sweet)
Salted Caramel
- ½ cup granulated sugar
- 2 tablespoons light corn syrup
- 3 tablespoons salted butter
- ⅓ cup heavy cream
- ¼ teaspoon salt
- 1 teaspoon vanilla extract
Toppings
- Chocolate curls or shavings
- Coarse salt (e.g., kosher salt)
Instructions
- Prepare the Chocolate Cups: Melt 1 cup (6 oz) of chocolate chips or chopped chocolate in the microwave at 50% power, stirring every 30 seconds until smooth. Line a muffin tin with muffin liners. Spoon 1½ tablespoons of the melted chocolate into each liner, spreading it up the sides to form a thick coat. Let the chocolate harden completely, then gently peel away the liners and set the cups aside.
- Make the Chocolate Mousse: Whisk 4 egg yolks and ¼ cup granulated sugar together until smooth. In a saucepan, heat 1 cup of heavy cream with 1 teaspoon vanilla extract and ⅛ teaspoon salt until hot but not boiling. Gradually whisk half of the hot cream into the egg mixture to temper it, then pour everything back into the saucepan. Cook over low heat, stirring constantly, until the mixture thickens and reaches 170°F (about 5 minutes). Remove from heat and stir in 1 cup chocolate chips or chopped chocolate until melted and smooth. Chill the mixture for 1 to 2 hours. Meanwhile, whip the remaining 1 cup of heavy cream to stiff peaks and gently fold it into the chilled chocolate mixture.
- Make the Salted Caramel: In a saucepan over medium heat, cook ½ cup granulated sugar and 2 tablespoons light corn syrup, stirring occasionally until the mixture turns a dark amber color (about 7 minutes). Carefully add 3 tablespoons salted butter and ⅓ cup heavy cream, stirring continuously. Stir in ¼ teaspoon salt and 1 teaspoon vanilla extract until smooth, then remove from heat and set aside.
- Assemble the Mousse Cups: Spoon a layer of the salted caramel into each hardened chocolate cup, followed by a layer of chocolate mousse. Add another drizzle of caramel on top. Garnish with coarse salt and chocolate curls or shavings.
- Chill and Serve: Refrigerate the assembled mousse cups for at least 4 hours to allow them to set completely before serving.
Notes
- Tempering the egg yolks with hot cream prevents curdling and ensures a smooth mousse.
- The chocolate cups can be made a day ahead and stored in an airtight container.
- Use a candy thermometer for accurate caramel temperature control.
- For firmer mousse, chill for the full 2 hours before folding in whipped cream.
- Adjust salt on top according to taste; coarse salt enhances the caramel’s flavor.


