
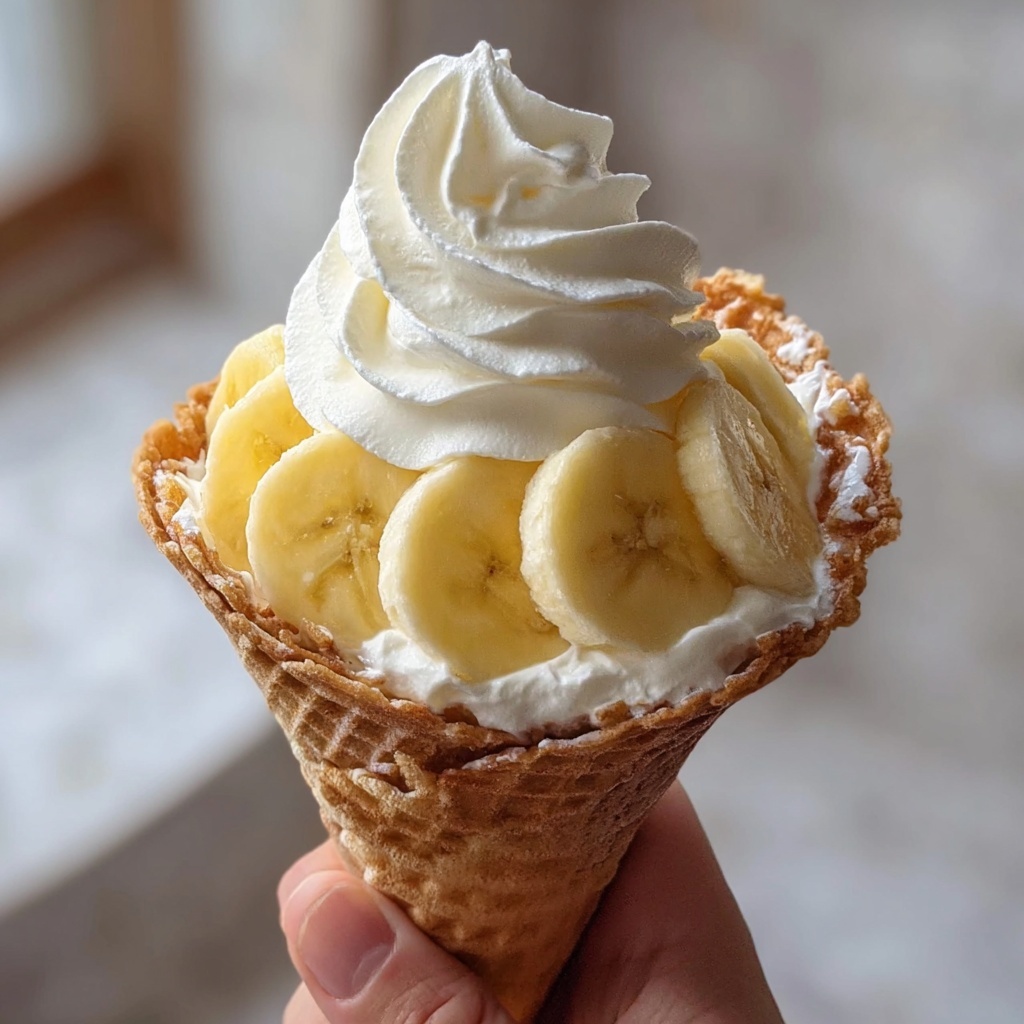
If you’ve ever dreamed of combining the creamy richness of cheesecake with the nostalgic comfort of banana pudding, then you’re in for a treat with this Banana Pudding Cheesecake Cones Recipe. This delightful dessert brings together velvety cheesecake filling, fresh banana slices, and a buttery graham cracker crust all packed into a portable ice cream cone, making it as fun to eat as it is decadent. It’s perfect for impressing friends at a summer gathering or simply indulging your sweet tooth with a hands-on treat that’s bursting with comfort and flavor.

Ingredients You’ll Need
The ingredients for this Banana Pudding Cheesecake Cones Recipe are simple but essential, each playing a key role in creating the perfect balance of flavors and textures. From the crisp graham cracker crust to the smooth cheesecake filling and fresh bananas, every element adds its own charm to this unique dessert.
- 1 cup crushed graham crackers: Provides a buttery, crunchy base that complements the creamy filling.
- 1/4 cup melted butter: Binds the graham crackers together and adds richness to the crust.
- 2 ripe bananas, sliced: Adds natural sweetness and fresh, fruity flavor to the dessert.
- 8 oz cream cheese, softened: The creamy heart of the cheesecake filling, lending smoothness and tang.
- 1 cup powdered sugar: Sweetens the cheesecake filling evenly, dissolving smoothly with no graininess.
- 1 cup whipped cream: Lightens the filling, giving it an airy texture so every bite melts in your mouth.
- 1 tsp vanilla extract: Adds warmth and depth to the cheesecake flavor.
- 4 ice cream cones: The playful vessel that holds all the delicious layers together, making this dessert portable and fun.
How to Make Banana Pudding Cheesecake Cones Recipe
Step 1: Prepare the Graham Cracker Crust
Begin by preheating your oven to 350°F (175°C). In a bowl, stir together the crushed graham crackers and melted butter until fully combined. This mixture forms the crisp crust that will create a delightful textural contrast to the creamy filling. Press the mixture firmly into the bottom of each ice cream cone mold or carefully fill the cones at the base. Bake for 5 minutes to set that crust and then allow it to cool completely, so it holds up during filling.
Step 2: Make the Creamy Cheesecake Filling
While your crusts cool, take the softened cream cheese and beat it in a large bowl until it becomes smooth and fluffy. Add the powdered sugar and vanilla extract to the cream cheese, mixing thoroughly to create a sweet and fragrant base. Gently fold in the whipped cream with a spatula to lighten the texture without deflating all the air. This step is crucial to achieving that perfect creamy yet airy cheesecake consistency.
Step 3: Assemble the Banana Pudding Cheesecake Cones
Now for the fun part — layering! Start by placing a few slices of ripe banana at the bottom over the crust. Then add a generous dollop of your cheesecake mixture on top. Continue layering banana slices and cheesecake filling, ensuring each cone is filled to the top without spilling. Finish with a final swirl of whipped cream and a few banana slices for a beautiful presentation. Chill the cones in the fridge for at least one hour to let all the flavors meld and the filling firm up.
How to Serve Banana Pudding Cheesecake Cones Recipe
Garnishes
To elevate your Banana Pudding Cheesecake Cones Recipe even further, try garnishing with a sprinkle of crushed graham crackers or a drizzle of caramel sauce. A few toasted pecans or a dusting of cinnamon can add a lovely warm spice dimension. These little touches not only enhance the flavor but also add visual appeal that will wow anyone lucky enough to try them.
Side Dishes
This dessert pairs wonderfully with fresh berries or a light fruit salad to balance its richness. A cup of freshly brewed coffee or tea can also complement the creamy sweetness and make for a relaxing dessert experience. If you want something a little more indulgent, a scoop of vanilla ice cream on the side will never disappoint.
Creative Ways to Present
Serve your Banana Pudding Cheesecake Cones Recipe at a summer picnic by placing them upright in a decorative cone holder or setting them in a shallow bowl of sugar for stability. You could even create a mini dessert bar, letting guests add their own toppings like chocolate chips, toasted coconut, or more fresh banana slices. Wrapping each cone in parchment paper tied with twine offers a charming, rustic touch perfect for gifting or parties.
Make Ahead and Storage
Storing Leftovers
If you have any leftover Banana Pudding Cheesecake Cones, keep them covered in the refrigerator. Because of the fresh bananas and cream cheese filling, they’re best enjoyed within 1 to 2 days to maintain freshness and avoid sogginess in the cones.
Freezing
While you can freeze the cheesecake filling itself, freezing assembled cones is not recommended, as the cones tend to get soggy and lose their crunch. Instead, freeze the cheesecake mixture separately in an airtight container and assemble with fresh bananas when ready to serve.
Reheating
Since this is a chilled no-bake dessert, reheating is not necessary or recommended. Just take the cones out of the refrigerator about 10 minutes before serving to allow them to soften slightly and enhance the flavors.
FAQs
Can I use different types of bananas for this recipe?
Absolutely! While ripe yellow bananas work best for sweetness and texture, you can experiment with varieties like baby bananas or even plantains for a unique twist, but be mindful of their flavor and firmness.
What can I substitute for the whipped cream?
You can use whipped coconut cream for a dairy-free option or heavy cream whipped to stiff peaks if you want a richer filling. Just make sure it’s light enough to fold in without deflating the mixture too much.
Can I make this recipe vegan?
Yes, with some adjustments! Use dairy-free cream cheese and coconut whipped cream along with vegan-friendly graham crackers and butter substitutes to create a vegan version of this delicious Banana Pudding Cheesecake Cones Recipe.
How do I prevent the ice cream cones from getting soggy?
Bake the graham cracker crust to create a moisture barrier, and assemble the cones shortly before serving. Keeping them chilled also helps maintain the crunch longer.
Is this recipe suitable for kids?
Definitely! This recipe is a fun, hands-on dessert that kids will love helping with, especially layering the bananas and filling. Just supervise with the oven step if they’re young.
Final Thoughts
This Banana Pudding Cheesecake Cones Recipe is a delightful way to combine classic flavors into an exciting, handheld treat that brings smiles with every bite. Whether you’re hosting a summer party or simply craving something sweet and creamy, these cones are sure to become a beloved favorite. Give them a try—you’ll wonder how you ever enjoyed banana pudding without the cheesecake twist and cone crunch!
Print
Banana Pudding Cheesecake Cones Recipe
- Prep Time: 20 minutes
- Cook Time: 5 minutes
- Total Time: 1 hour 25 minutes
- Yield: 4 servings
- Category: Dessert
- Method: Baking
- Cuisine: American
- Diet: Vegetarian
Description
Delight in these Banana Pudding Cheesecake Cones, a fun and portable twist on classic banana pudding and cheesecake. Crispy graham cracker crusts baked perfectly in ice cream cones are filled with a smooth, creamy cheesecake mixture layered with fresh banana slices. Topped with whipped cream and extra banana, this dessert is chilled to set for a cool, indulgent treat perfect for any occasion.
Ingredients
Crust
- 1 cup crushed graham crackers
- 1/4 cup melted butter
Filling
- 2 ripe bananas, sliced
- 8 oz cream cheese, softened
- 1 cup powdered sugar
- 1 cup whipped cream
- 1 tsp vanilla extract
Assembly
- 4 ice cream cones
Instructions
- Preheat the oven: Set your oven to 350°F (175°C) to prepare for baking the crusts.
- Prepare graham cracker crust: In a mixing bowl, combine the crushed graham crackers with melted butter until the mixture resembles wet sand.
- Form crust in cones: Press the graham cracker mixture firmly into the bottom of each ice cream cone mold, creating an even crust layer.
- Bake the crusts: Place the molds in the oven and bake for 5 minutes to set the crust, then remove and allow them to cool completely.
- Make cheesecake filling: In a clean bowl, beat the softened cream cheese until it becomes smooth and creamy.
- Add sugar and vanilla: Mix in the powdered sugar and vanilla extract until fully incorporated and smooth.
- Fold in whipped cream: Gently fold whipped cream into the cream cheese mixture carefully to maintain airiness and create a light texture.
- Assemble cones: Layer sliced bananas alternately with the cheesecake mixture inside each crust-lined cone, filling it generously.
- Add toppings: Top each filled cone with additional whipped cream and a few banana slices for garnish.
- Chill to set: Refrigerate the filled cones for at least 1 hour before serving to let the filling firm up and flavors meld.
Notes
- Use ripe bananas for the best natural sweetness and flavor.
- Softened cream cheese ensures a smooth filling without lumps.
- Gentle folding of whipped cream keeps the filling light and airy.
- Make sure cones are upright and stable while assembling to prevent spills.
- Optional: Sprinkle a little cinnamon or nutmeg on top for added warmth.
- Can be prepared a day ahead and kept refrigerated for convenience.

