
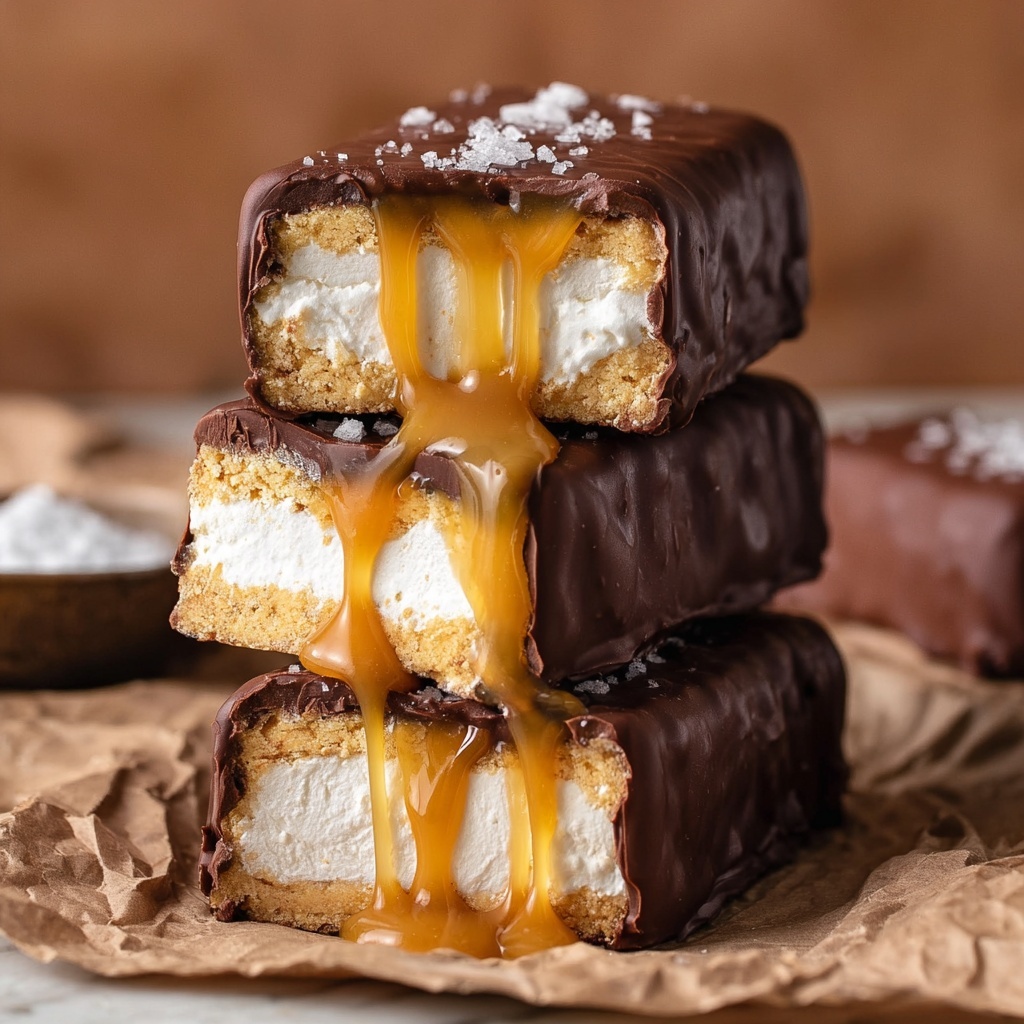
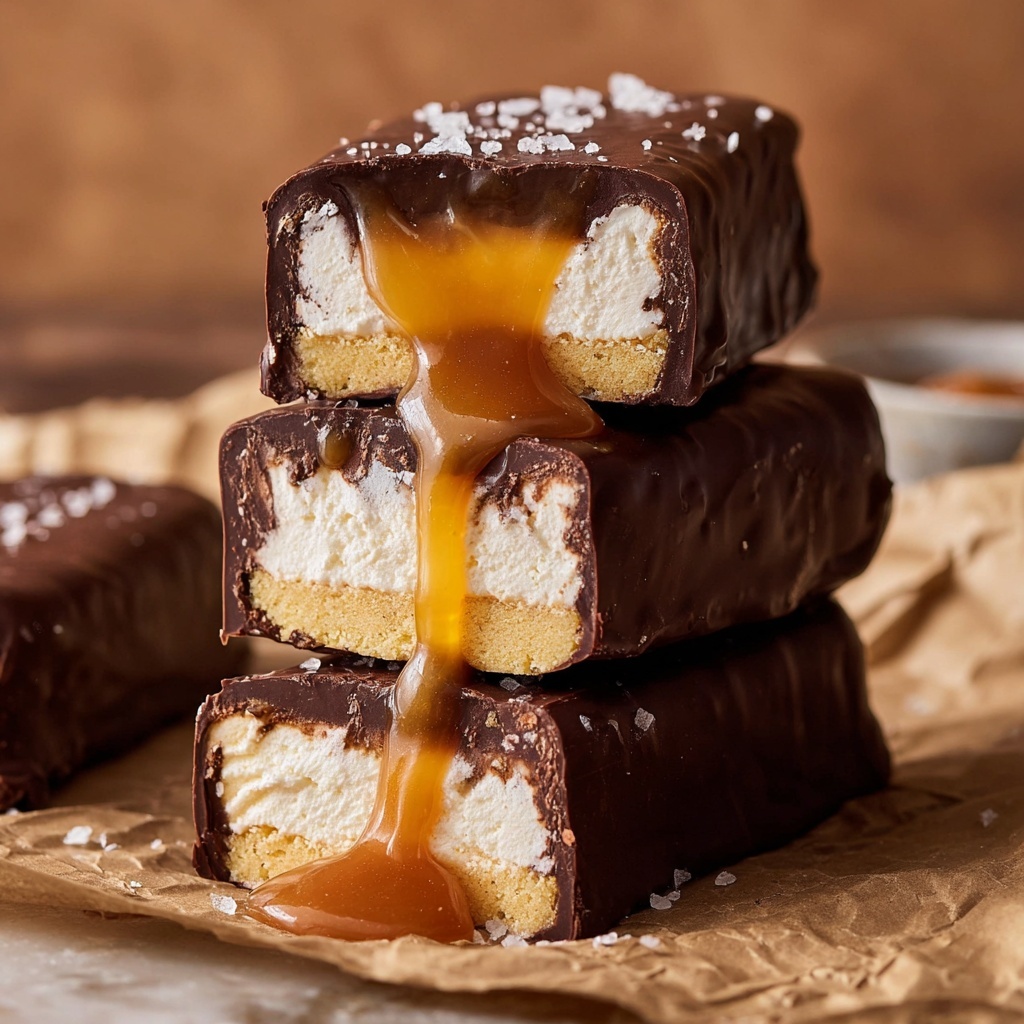
If you’ve ever longed for the perfect vegan twist on a nostalgic candy bar, this Vegan Twix Ice Cream Bars Recipe is your new best friend. Blending a crunchy cookie crust with a creamy oat-based ice cream, luscious caramel center, and a rich chocolate coating, these bars are pure indulgence. They bring all the familiar flavors of a classic Twix bar but in a delightfully dairy-free, cruelty-free form that everyone can enjoy. Whether you’re craving a cool treat on a hot day or want to impress friends with something uniquely delicious, this recipe will quickly become a cherished favorite in your dessert repertoire.
Ingredients You’ll Need
Simple yet carefully selected ingredients come together to create the magic of these bars. Every component plays a vital role, from giving the crust its perfect crunch to the smooth, creamy texture of the ice cream and the sweet, gooey caramel that ties it all together.
- 100 g golden Oreos (or other vegan cookies): The foundation for our cookie crust, providing crunch and subtle sweetness.
- 25 g unsalted vegan butter (block-style): Helps bind the crust with rich, buttery flavor without dairy.
- ¼ teaspoon sea salt: Enhances all the flavors, balancing sweetness perfectly.
- 400 ml oat whipping cream: Creates the luscious, creamy texture for the ice cream filling.
- 250 g sweetened condensed oat milk: Adds natural sweetness and richness for a smooth base.
- 1 teaspoon vanilla bean paste (or vanilla extract): Brings aromatic warmth and depth to the ice cream.
- 150 g vegan caramel: For that gooey, irresistible middle that will remind you exactly why Twix bars are so beloved.
- 1 tablespoon coconut oil (optional): Helps the chocolate coating set with a silky finish and shine.
How to Make Vegan Twix Ice Cream Bars Recipe
Step 1: Prepare Your Pan and Ingredients
Start by lining a 9″ loaf pan with parchment paper on the base and sides. This step is crucial for easy removal of your bars later on. Also, take a moment to ensure you have all your ingredients and equipment handy — it makes the whole process smoother and way more enjoyable.
Step 2: Create the Cookie Crust
Pop the golden Oreos, sea salt, and vegan butter into a food processor, and blitz everything until the mixture clumps together when pressed. This crust is the crunchy base that gives your bars that addictive texture. Press it firmly and evenly into the bottom of your lined pan, smoothing it out with your hands or a spoon. Once done, chill it in the fridge to set while you prepare the filling.
Step 3: Whip Up the Creamy Filling
Grab your stand mixer or a handy whisk, and beat the oat whipping cream until smooth and slightly thickened. Next, add the sweetened condensed oat milk and vanilla bean paste, mixing everything together until perfectly combined. Pour this luscious filling over your chilled cookie crust and pop the pan into the freezer for at least four hours to set — or overnight if you have more patience!
Step 4: Scoop Out the Caramel Wells
Once your ice cream base is frozen solid, let it sit at room temperature for about 10 minutes so it softens just enough to scoop. Using a small spoon or melon baller, carefully create seven wells in the filling, leaving a little space between each and stopping a hair before reaching the edges to keep your bars intact when you slice them.
Step 5: Fill the Wells with Caramel
Fill a piping bag with your vegan caramel and gently pipe it into each well you scooped out. Be mindful not to overfill — you want a generous caramel center, but without it spilling over the edges. Place the pan back into the freezer for at least one more hour to allow the caramel to firm up.
Step 6: Slice Into Bars
Using a sharp knife, carefully cut the ice cream loaf into seven bars, ensuring each one has a beautiful caramel center. Place the bars on a parchment paper-lined tray and return them to the freezer, keeping them firm until you’re ready for the next delicious step.
Step 7: Coat Your Bars in Chocolate
Melt vegan chocolate along with the coconut oil if using, over a double boiler, stirring until it’s silky and smooth. Pour this luscious chocolate into a shallow bowl. Dip each bar carefully into the chocolate using a fork and spoon, then set them onto fresh parchment paper. Sprinkle a touch of sea salt over the top to elevate the flavors and freeze the bars again for at least 15 minutes so the chocolate hardens beautifully.
Step 8: Enjoy Your Creation
Your Vegan Twix Ice Cream Bars Recipe is now complete and ready to be devoured — or stored away for future indulgence.
How to Serve Vegan Twix Ice Cream Bars Recipe
Garnishes
A sprinkle of flaky sea salt or some finely chopped nuts adds a delightful contrast to the creamy, sweet bars and boosts their visual appeal. You could also drizzle a little extra vegan caramel or vegan chocolate for that wow-factor if serving to guests.
Side Dishes
These ice cream bars are a perfect standalone treat, but pairing them with fresh berries or a tangy raspberry coulis creates a refreshing counterpoint that highlights the caramel and chocolate flavors wonderfully. A scoop of fresh coconut-based sorbet can also complement the creamy texture while keeping it vegan and light.
Creative Ways to Present
Try serving these bars on a rustic wooden board with small bowls of extra caramel sauce and melted chocolate for dipping. Or wrap them individually in parchment paper tied with a pretty ribbon to gift to friends and family — they make an unforgettable homemade present!
Make Ahead and Storage
Storing Leftovers
Leftover Vegan Twix Ice Cream Bars should be kept in an airtight container in the freezer to maintain their texture and flavor. For best results, wrap each bar individually in parchment paper before storing; this prevents them from sticking together and protects the chocolate coating.
Freezing
This recipe is perfect for making ahead since it freezes so well. You can prepare the bars entirely in advance and keep them frozen for up to one month, allowing you to enjoy a fancy dessert anytime without the wait.
Reheating
Since these are frozen treats, there’s no reheating involved. Just let the bars sit at room temperature for 5 to 10 minutes before serving if they are too hard to bite into, and they will soften slightly to the perfect creamy texture.
FAQs
Can I use other types of plant-based milk for this recipe?
While oat milk works best here for its creamy consistency and natural sweetness, you can experiment with other plant milks like almond or soy milk for the condensed variety, but results might vary slightly in texture and flavor.
Is it necessary to use coconut oil in the chocolate coating?
Coconut oil is optional, but it helps the chocolate set with a smooth, shiny finish and a nice snap. If you prefer, you can skip it, though your chocolate might be a bit thicker and less glossy.
How long should I freeze the bars before eating?
For the best texture, freeze the bars for at least 4 hours — ideally overnight — before scooping the wells or slicing. After coating them in chocolate, freeze again for a minimum of 15 minutes so the coating hardens well.
Can I make these bars nut-free?
Absolutely! This recipe is naturally nut-free as long as the vegan cookies and caramel you use do not contain nuts. Always double-check ingredient labels to be safe.
What’s the best way to cut the bars cleanly?
Use a sharp knife warmed in hot water and wiped dry between cuts to get clean, neat edges without cracking the chocolate layer or damaging the caramel center.
Final Thoughts
Making this Vegan Twix Ice Cream Bars Recipe at home is an absolute joy, and the result is a dreamy, cool treat that’s both nostalgic and refreshingly new. It’s a perfect way to showcase how delicious vegan desserts can be, with rich flavors and indulgent textures all from simple, plant-based ingredients. I can’t wait for you to try these bars and share them with your loved ones — be prepared for endless compliments and requests for seconds!
Print
Vegan Twix Ice Cream Bars Recipe
- Prep Time: 40 minutes
- Cook Time: 0 minutes
- Total Time: 5 hours 40 minutes
- Yield: 7 bars
- Category: Dessert
- Method: No-Cook
- Cuisine: Vegan
- Diet: Vegan
Description
This Vegan Twix Ice Cream recipe combines a crunchy golden Oreo cookie crust with a creamy oat-based ice cream filling and a luscious vegan caramel center, all coated in rich chocolate. Perfect for a homemade, dairy-free frozen treat that’s indulgent yet plant-based.
Ingredients
Crust
- 100 g golden Oreos (or other vegan cookies)
- 25 g unsalted vegan butter (block-style)
- ¼ teaspoon sea salt
Ice Cream Filling
- 400 ml oat whipping cream
- 250 g sweetened condensed oat milk
- 1 teaspoon vanilla bean paste (or vanilla extract)
Caramel and Coating
- 150 g vegan caramel
- 1 tablespoon coconut oil (optional, for chocolate coating)
- 100 g vegan dark chocolate (for coating, implied by instructions)
- Sea salt (to sprinkle on top after coating)
Instructions
- Prepare: Line the base and sides of a 9″ loaf pan with parchment paper. Make sure you have all ingredients and equipment ready and review the steps and images carefully before starting.
- Make the crust: Place the golden Oreos, sea salt, and vegan butter in a food processor and blitz until the mixture sticks together when pressed. Press this mixture firmly into the bottom of the lined loaf pan and smooth it out. Refrigerate while preparing the filling.
- Make the filling: Whisk the oat whipping cream using a stand mixer or hand whisk until smooth and slightly thickened. Add the sweetened condensed oat milk and vanilla bean paste, then whisk again to combine thoroughly. Pour this filling over the chilled crust in the pan, spreading evenly. Freeze for at least 4 hours or overnight.
- Create caramel wells: Once the ice cream is frozen, take it out and allow to soften slightly at room temperature for about 10 minutes. Using a half-teaspoon measure or small melon baller, scoop out 7 wells in the ice cream, stopping about ½ cm from the edges and leaving enough space between wells for later cutting.
- Add caramel: Transfer the vegan caramel to a piping bag and pipe it carefully into the wells you’ve created, ensuring not to overfill so caramel doesn’t spill over. Return the pan to the freezer and chill for at least one hour to firm up.
- Slice into bars: Using a sharp knife, carefully cut the filled ice cream block into 7 bars, each with a caramel center. Place the bars on a parchment-lined tray and freeze until ready for coating.
- Coat bars in chocolate: Gently melt vegan dark chocolate and coconut oil over a double boiler, stirring until smooth. Pour the melted chocolate into a shallow bowl. Dip each bar using a fork and spoon to fully coat with chocolate. Place coated bars on parchment paper, sprinkle lightly with sea salt, and freeze for 15 minutes until set.
- Store: Keep the vegan Twix ice cream bars in an airtight container in the freezer for up to one month. For best results, wrap each bar individually in parchment paper before storing to prevent sticking.
Notes
- Use golden Oreos or any vegan-friendly cookies for the crust to maintain the vegan aspect.
- Coconut oil is optional for the chocolate coating but helps give a glossy finish and smooth texture.
- Letting the ice cream soften slightly before scooping wells makes it easier to create the caramel pockets without cracking the bars.
- Be careful not to overfill the caramel wells to avoid mess during coating and serving.
- For a neater cut, warm your knife slightly or wipe it clean after each slice.
- Individual wrapping prevents the bars from sticking together during storage.


