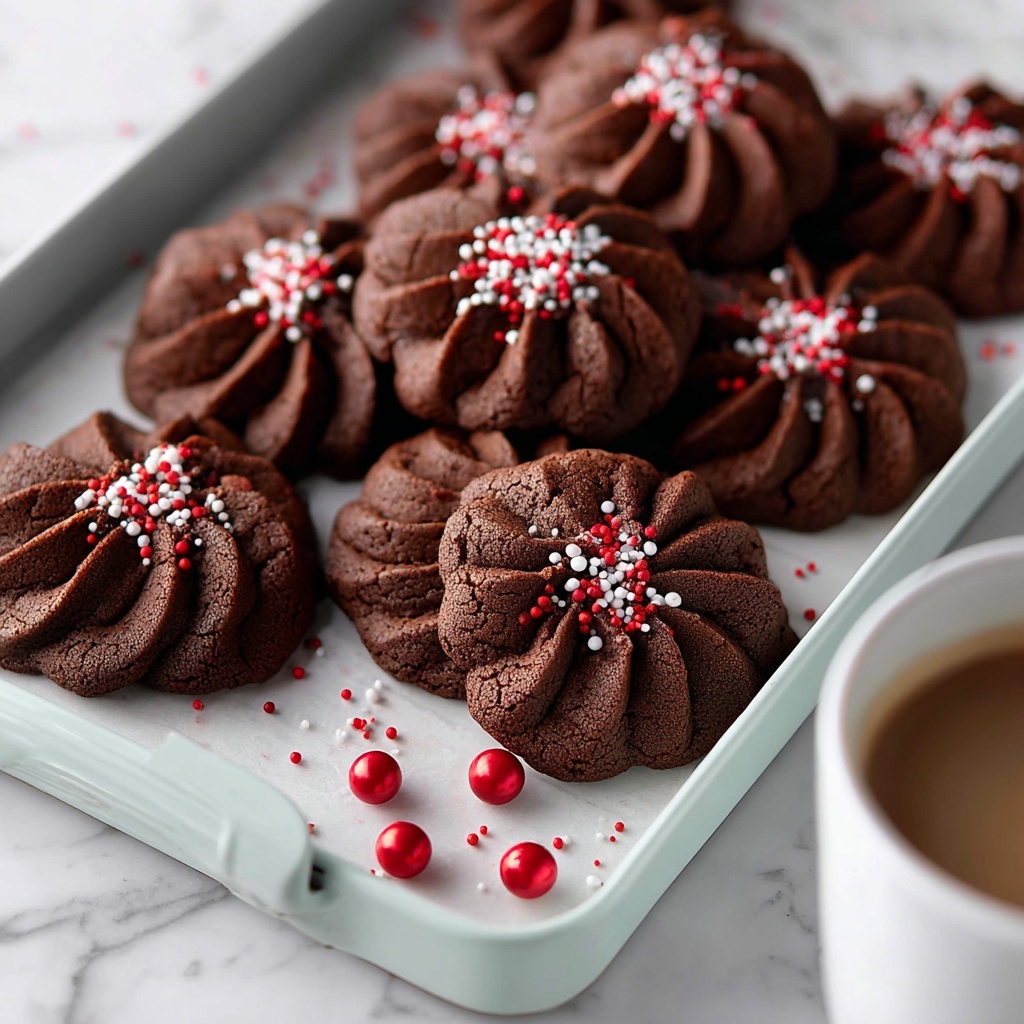
If you’re searching for a delightful treat that merges rich chocolate flavor with a buttery, melt-in-your-mouth texture, then this Piped Chocolate Butter Cookies Recipe is going to become your new favorite. These cookies boast a beautiful, elegant shape thanks to the piping technique, combining simplicity with show-stopping presentation. Perfectly crisp on the edges and soft inside, each bite delivers a heavenly balance of cocoa richness and buttery goodness that makes them irresistible for any occasion.
Ingredients You’ll Need
This recipe calls for a handful of simple, classic ingredients that work together perfectly to create the magical texture and flavor of these cookies. Each ingredient plays a crucial role, whether it’s adding richness, sweetness, or that lovely cocoa color.
- 1 cup unsalted butter, softened: Provides the creamy base and rich flavor, essential for that buttery texture.
- ½ cup powdered sugar: Adds sweetness and helps achieve a smooth, light dough perfect for piping.
- 1 teaspoon vanilla extract: Brightens the chocolate flavor with its warm, aromatic notes.
- 1¾ cups all-purpose flour: Gives structure to the dough, ensuring the cookies hold their shape beautifully.
- ¼ cup unsweetened cocoa powder: Infuses the cookies with deep chocolate intensity and a lovely dark color.
- 1-2 tablespoons milk: Adjusts dough consistency for smooth, easy piping without losing firmness.
- Melted chocolate: For drizzling—adds an extra layer of indulgence and visual appeal.
- Sprinkles or chopped nuts: Optional fun and texture elements to elevate your cookie presentation.
How to Make Piped Chocolate Butter Cookies Recipe
Step 1: Preheat the Oven and Prepare Baking Sheets
Start by preheating your oven to 350°F (175°C) and lining your baking sheets with parchment paper. This ensures your cookies bake evenly and prevents sticking, which is essential when working with piped dough.
Step 2: Cream Butter and Sugar
Beat the softened butter and powdered sugar together until the mixture turns light and fluffy. This aeration step is key—it gives the cookies a tender crumb and delicate texture that melts on your tongue.
Step 3: Add Vanilla and Dry Ingredients
Pour in the vanilla extract and mix to blend its fragrant warmth. Then, slowly sift in the flour and unsweetened cocoa powder, stirring until a soft dough forms. If the dough feels too stiff to pipe, add milk by the tablespoon until it reaches a thick yet squeezable consistency.
Step 4: Prepare for Piping
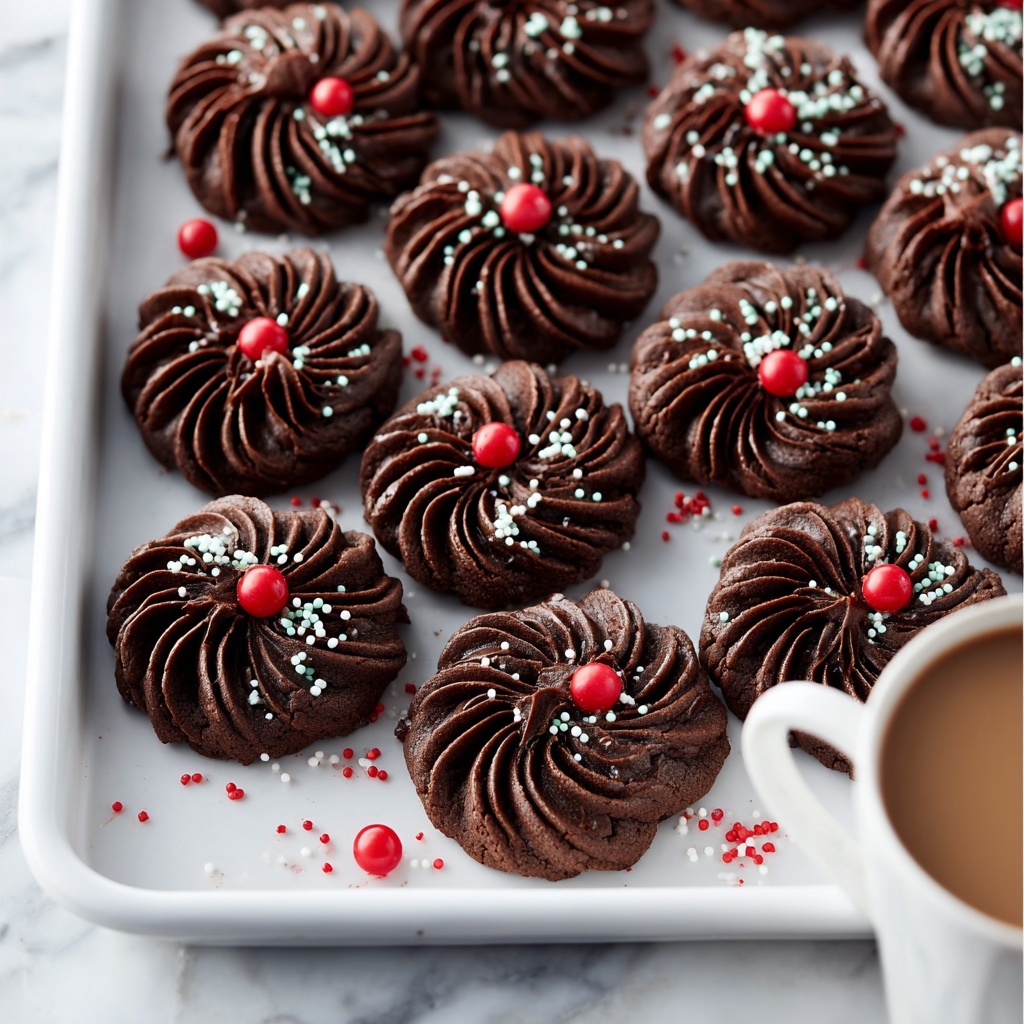
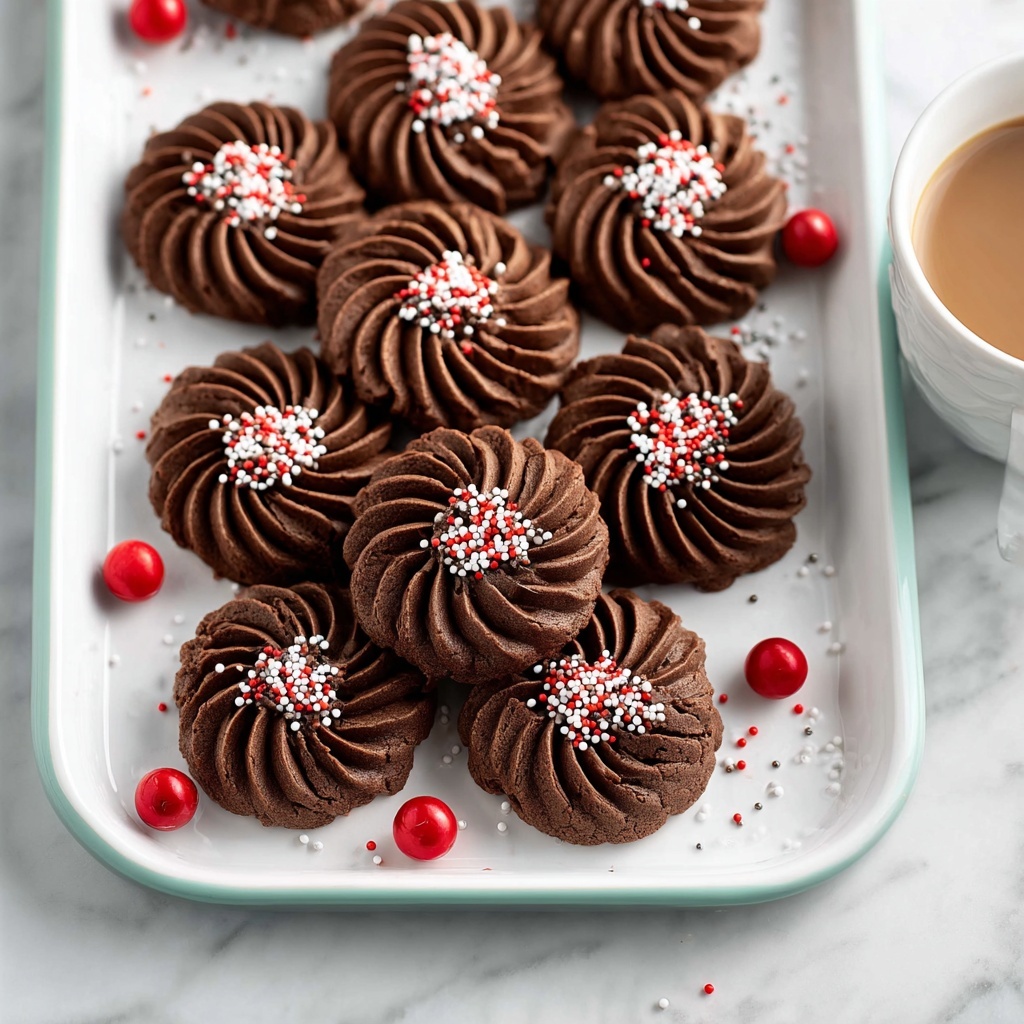
Transfer your dough to a piping bag fitted with a large star tip. This is where your cookies begin to take shape! Pipe your dough onto the prepared sheets, creating beautiful swirls or rosettes that will bake into delicate, dainty cookies.
Step 5: Bake and Cool
Bake your cookies for 10 to 12 minutes until the edges are set but the centers remain tender. Remove the trays and let the cookies cool on the baking sheets for about 5 minutes—this helps them firm up before moving to the wire racks.
Step 6: Decorate (Optional)
Once completely cool, get creative by drizzling melted chocolate over the cookies or dipping them for extra decadence. Add sprinkles or chopped nuts immediately so they stick. These finishing touches add charm, flavor, and a bit of crunch.
How to Serve Piped Chocolate Butter Cookies Recipe
Garnishes
Simple garnishes like a drizzle of melted chocolate or a scatter of colorful sprinkles instantly elevate these cookies from everyday to festive. A dusting of powdered sugar or a few edible gold flakes can turn them into elegant treats ready for special occasions.
Side Dishes
These cookies pair beautifully with a warm cup of coffee or a glass of cold milk, balancing the rich cocoa notes. For an indulgent treat, serve alongside a scoop of vanilla or caramel ice cream for a delightful dessert combo.
Creative Ways to Present
Arrange your piped cookies on a pretty platter layered with parchment for a charming display. Tie small cookie bags with twine and add a handwritten tag for a lovely homemade gift. You can even sandwich two cookies together with a dollop of whipped chocolate ganache for an irresistible chocolate sandwich cookie.
Make Ahead and Storage
Storing Leftovers
Keep leftover cookies fresh by storing them in an airtight container at room temperature for up to a week. Adding a slice of bread to the container helps retain moisture so they stay tender and delicious.
Freezing
These cookies freeze wonderfully. Place them in a single layer on a baking sheet to freeze initially, then transfer to a freezer-safe bag or container. When stored properly, they can last for up to 3 months without losing flavor or texture.
Reheating
To enjoy the cookies as if freshly baked, gently warm them in a low oven (about 300°F) for 5 minutes or pop a few seconds in the microwave. This revives their soft texture and brings back the buttery aroma.
FAQs
Can I use salted butter for this recipe?
Yes, you can, but reduce or omit any additional salt in the recipe because salted butter will add extra saltiness, which might affect the balance of flavors in your cookies.
What type of piping tip should I use?
A large star tip is ideal for this recipe. It creates beautiful ridges and the classic swirl shape that makes these cookies visually stunning and perfect for holding drizzled chocolate or toppings.
Can I substitute cocoa powder with melted chocolate?
Substituting cocoa powder with melted chocolate will change the dough’s consistency and moisture content. It’s best to stick to the recipe for consistent piping and baking results.
How do I ensure the cookies don’t spread too much while baking?
Make sure the butter is softened but not melted, and check your oven temperature with an oven thermometer. Piping the dough on parchment paper also helps keep the shapes neat as they bake.
Can I add flavors other than vanilla?
Absolutely! Feel free to experiment with almond extract, orange zest, or even a hint of espresso powder to complement the chocolate and add your own twist to this Piped Chocolate Butter Cookies Recipe.
Final Thoughts
This Piped Chocolate Butter Cookies Recipe is a charming way to combine simplicity and elegance in your baking. With just a few staple ingredients and a fun piping technique, you get irresistible cookies that taste like a little piece of heaven. Try making them soon—you’ll be handing out compliments with every batch you share!
Print
Piped Chocolate Butter Cookies Recipe
- Prep Time: 15 minutes
- Cook Time: 12 minutes
- Total Time: 30 minutes
- Yield: 24 servings
- Category: Dessert
- Method: Baking
- Cuisine: American
Description
Delight in these rich and tender Piped Chocolate Butter Cookies, perfect for any occasion. Made with a blend of cocoa powder and buttery goodness, piped into elegant shapes, then optionally decorated with melted chocolate and sprinkles or nuts for a festive touch. These cookies are easy to prepare and bake to perfection in just 30 minutes, making them a fantastic choice for holiday treats or everyday indulgence.
Ingredients
Cookie Dough
- 1 cup unsalted butter, softened
- ½ cup powdered sugar
- 1 teaspoon vanilla extract
- 1¾ cups all-purpose flour
- ¼ cup unsweetened cocoa powder
- 1–2 tablespoons milk (as needed for piping consistency)
Decoration (Optional)
- Melted chocolate for drizzling
- Sprinkles or chopped nuts
Instructions
- Preheat the Oven: Preheat your oven to 350°F (175°C) and line baking sheets with parchment paper to prevent sticking and ensure even baking.
- Cream Butter and Sugar: In a mixing bowl, beat the softened unsalted butter and powdered sugar together until the mixture becomes light, fluffy, and pale in color, which should take about 2-3 minutes.
- Add Vanilla and Dry Ingredients: Stir in the vanilla extract. Gradually incorporate the all-purpose flour and unsweetened cocoa powder into the mixture, mixing until a soft dough forms. Add 1 to 2 tablespoons of milk as needed to achieve a consistency suitable for piping.
- Prepare for Piping: Transfer the dough into a piping bag fitted with a large star tip. Pipe your desired shapes onto the prepared baking sheets, spacing them to allow for slight spreading during baking.
- Bake: Bake the cookies in the preheated oven for 10 to 12 minutes, or until the edges are set and firm to the touch. Let the cookies cool on the baking sheets for 5 minutes before transferring them to a wire rack to cool completely.
- Decorate (Optional): Once the cookies have cooled, drizzle or dip them in melted chocolate. While the chocolate is still wet, sprinkle with sprinkles or chopped nuts for added texture and flavor.
Notes
- For best piping results, ensure the dough is soft but not too runny; adjust milk quantity accordingly.
- Use parchment paper or silicone baking mats to prevent sticking and ease cleanup.
- Store cookies in an airtight container at room temperature for up to one week.
- These cookies freeze well—store in airtight containers or freezer bags for up to 3 months.
- Experiment with different piping tips for varied shapes and textures.
