
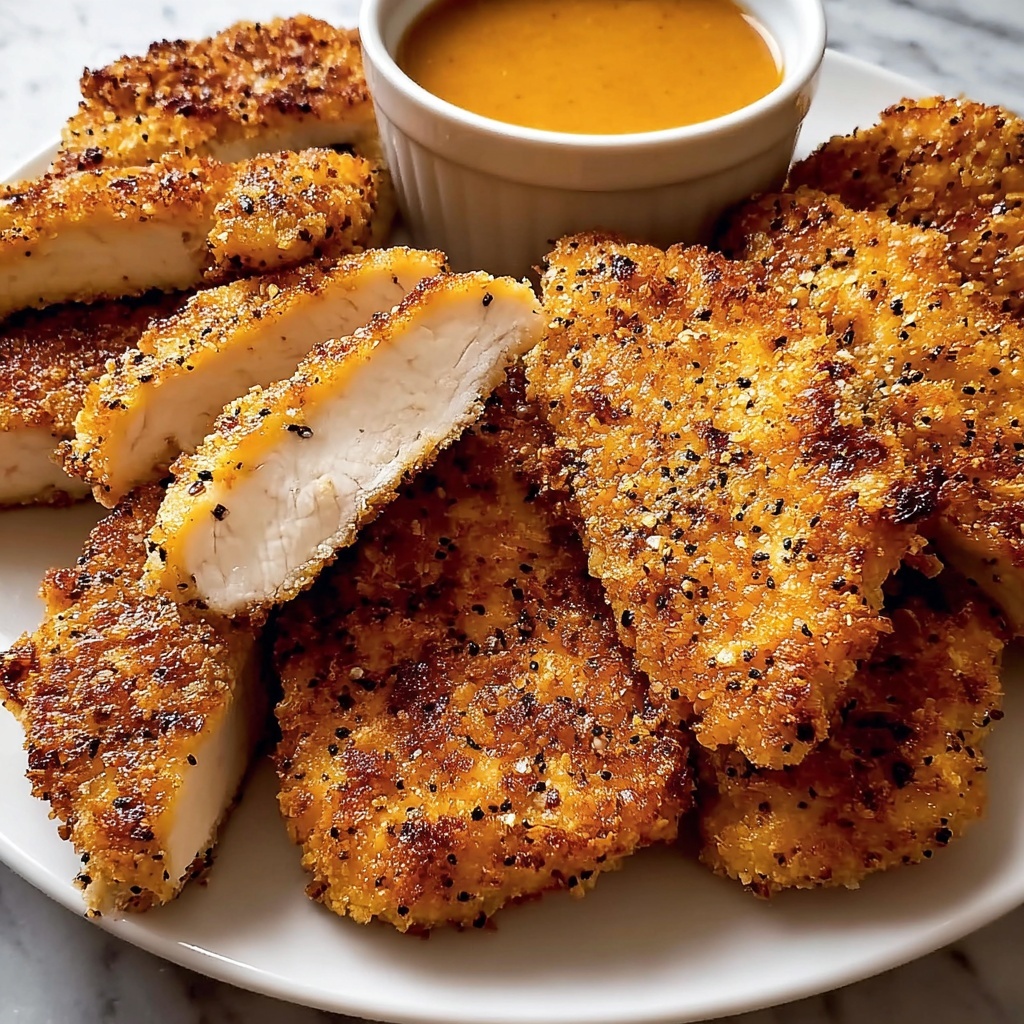
If you’re searching for a snack or meal that’s irresistibly crunchy on the outside yet tender and juicy inside, this Crispy Oven Chicken Tenders Recipe is here to become your new best friend. With simple pantry staples transformed into golden perfection, these tenders deliver a flavorful, crispy bite without the need for frying, making them a healthier alternative that still satisfies that crave-worthy crispiness. Whether it’s a weeknight dinner or a party appetizer, this recipe promises a crowd-pleasing experience that’s easy to pull together and simply delicious.
Ingredients You’ll Need
Gathering the right ingredients is half the fun, and every single one in this Crispy Oven Chicken Tenders Recipe plays a crucial role. From creating the perfect crunchy coating to enhancing flavor with just the right amount of seasoning, these essentials are straightforward but powerful.
- 1 pound chicken breast, cut into strips: Use fresh, evenly cut strips to ensure they cook evenly and stay juicy inside.
- 1 cup breadcrumbs: These form the crispy outer layer – panko breadcrumbs can be used for an extra crunch.
- 1/2 cup flour: Lightly dusting the chicken helps the egg coating stick better for a uniform crust.
- 2 eggs: Beaten eggs act as the glue that binds the coating to each tender perfectly.
- 1 teaspoon salt: Enhances the natural flavor of the chicken and balances the seasoning.
- 1/2 teaspoon pepper: Adds a subtle hint of heat and depth to the taste.
- 1 teaspoon garlic powder: Infuses savory warmth and aroma to every bite.
- 1 teaspoon paprika: Adds a slight smoky note and gorgeous color to the coating.
How to Make Crispy Oven Chicken Tenders Recipe
Step 1: Preheat Your Oven
Start by heating your oven to 400°F (200°C). This high temperature is perfect for getting the outside of your chicken tenders beautifully golden while ensuring the inside cooks through without drying out. A hot oven equals crispier results!
Step 2: Prepare the Baking Sheet
Line a baking sheet with parchment paper to prevent sticking and make clean-up a breeze. This also allows the tenders to bake evenly without oil.
Step 3: Set Up Your Breading Station
Create three separate bowls: one filled with flour, one with beaten eggs, and the last with breadcrumbs mixed with salt, pepper, garlic powder, and paprika. This setup keeps the process neat and helps achieve that perfect multi-layer breading that crunches with every bite.
Step 4: Coat the Chicken Strips
Dip each chicken strip first into the flour, coating it lightly. Next, dunk it into the beaten eggs, then finally roll it generously in the spiced breadcrumbs. This triple-step ensures each tender is covered in a delicious, crispy crust.
Step 5: Arrange on the Baking Sheet
Place each breaded chicken tender on your prepared baking sheet, making sure they’re spaced out slightly. This spacing helps the hot air circulate around each piece, promoting an even golden browning.
Step 6: Bake to Perfection
Bake for 20 to 25 minutes, turning once halfway through if you like, until each tender is crispy, golden brown, and cooked through. The aroma alone will have you eager to dig in!
Step 7: Serve Hot with Your Favorite Dipping Sauce
Once out of the oven, serve these crispy gems immediately for the best texture and flavor. Pair them with your go-to dipping sauce for an extra burst of flavor and fun.
How to Serve Crispy Oven Chicken Tenders Recipe

Garnishes
Sprinkle freshly chopped parsley or a squeeze of lemon juice over the tenders just before serving to add a fresh, zesty brightness that complements the crunchy coating beautifully.
Side Dishes
This Crispy Oven Chicken Tenders Recipe pairs wonderfully with classic sides like creamy coleslaw, crisp carrot sticks, or a fresh green salad to balance the meal. For a heartier option, try crispy baked fries or mashed potatoes.
Creative Ways to Present
Serve the tenders on a rustic wooden board with an assortment of dipping sauces ranging from honey mustard to spicy sriracha mayo. Or pile them in soft buns with lettuce and pickles for a fun chicken tender sandwich that’s sure to impress.
Make Ahead and Storage
Storing Leftovers
Let any leftover chicken tenders cool completely, then store them in an airtight container in the fridge for up to 3 days. Keeping them well-sealed helps maintain their texture and flavor.
Freezing
To freeze, arrange cooled tenders in a single layer on a baking sheet and freeze until firm, then transfer to a freezer-safe bag. They will stay good for up to 2 months, perfect for quick meals on busy days.
Reheating
Reheat leftover chicken tenders in a preheated oven at 375°F (190°C) for about 10 minutes to regain their crispiness. Avoid microwaving if you want to keep that signature crunch intact.
FAQs
Can I use chicken thighs instead of breasts?
Absolutely! Chicken thighs are juicier and still work great in this recipe, though the cooking time may vary slightly depending on thickness.
What if I don’t have paprika?
No worries, you can substitute with smoked paprika for a smokier flavor or simply leave it out; the garlic powder and other spices still provide plenty of taste.
Can I make this recipe gluten-free?
Yes! Swap regular flour and breadcrumbs for gluten-free versions, and ensure your spices are gluten-free too, to enjoy this dish without worry.
How do I get extra crispy tenders?
Using panko breadcrumbs instead of regular ones and baking on a wire rack to let air circulate underneath can make the crust even crunchier.
Is this recipe kid-friendly?
Definitely! Because the tenders are baked, not fried, they’re a healthier alternative that kids tend to love thanks to their crunchy texture and mild flavor.
Final Thoughts
If you haven’t tried this Crispy Oven Chicken Tenders Recipe yet, you’re in for a treat. The combination of simplicity, crunch, and delicious seasoning is truly unbeatable. It’s one of those go-to recipes that fits any occasion, satisfies every craving, and makes dinnertime fun again. Give it a whirl, and I promise it’ll become one of your favorites too!
Print
Crispy Oven Chicken Tenders Recipe
- Prep Time: 10 minutes
- Cook Time: 20-25 minutes
- Total Time: 35 minutes
- Yield: 4 servings
- Category: Main Course
- Method: Baking
- Cuisine: American
Description
These crispy oven chicken tenders are a perfect balance of crunchy and juicy, baked to golden perfection. They offer a healthier alternative to fried tenders while maintaining that beloved crispiness. Easy to prepare and perfect for a quick weeknight dinner or a crowd-pleasing appetizer.
Ingredients
Chicken
- 1 pound chicken breast, cut into strips
Breading
- 1 cup breadcrumbs
- 1/2 cup flour
- 2 eggs
- 1 teaspoon salt
- 1/2 teaspoon pepper
- 1 teaspoon garlic powder
- 1 teaspoon paprika
Instructions
- Preheat oven: Preheat your oven to 400°F (200°C) to ensure it’s at the optimal temperature for baking crispy tenders.
- Prepare baking sheet: Line a baking sheet with parchment paper to prevent sticking and make for easier cleanup.
- Set up breading station: Arrange three bowls: one with flour, one with beaten eggs, and one with breadcrumbs mixed with salt, pepper, garlic powder, and paprika to evenly coat the chicken.
- Coat chicken strips: Dip each chicken strip first into the flour, then coated with egg, and finally thoroughly covered with the seasoned breadcrumb mixture for a crispy crust.
- Arrange on baking sheet: Place the coated chicken tenders evenly spaced on the prepared baking sheet to promote even cooking.
- Bake: Bake in the preheated oven for 20-25 minutes or until the chicken tenders are golden brown and the internal temperature reaches 165°F (74°C), ensuring they are cooked through and crispy.
- Serve: Serve hot immediately with your favorite dipping sauce such as honey mustard, ranch, or barbecue sauce for maximum enjoyment.
Notes
- For extra crispiness, spray the tenders lightly with cooking spray before baking.
- Chicken tenders can be marinated in buttermilk for 30 minutes beforehand to tenderize the meat.
- Use panko breadcrumbs for an even crunchier texture.
- Adjust seasoning in the breadcrumb mix to taste; adding cayenne pepper offers a spicy kick.
- Ensure chicken strips are evenly sized for uniform cooking.


