
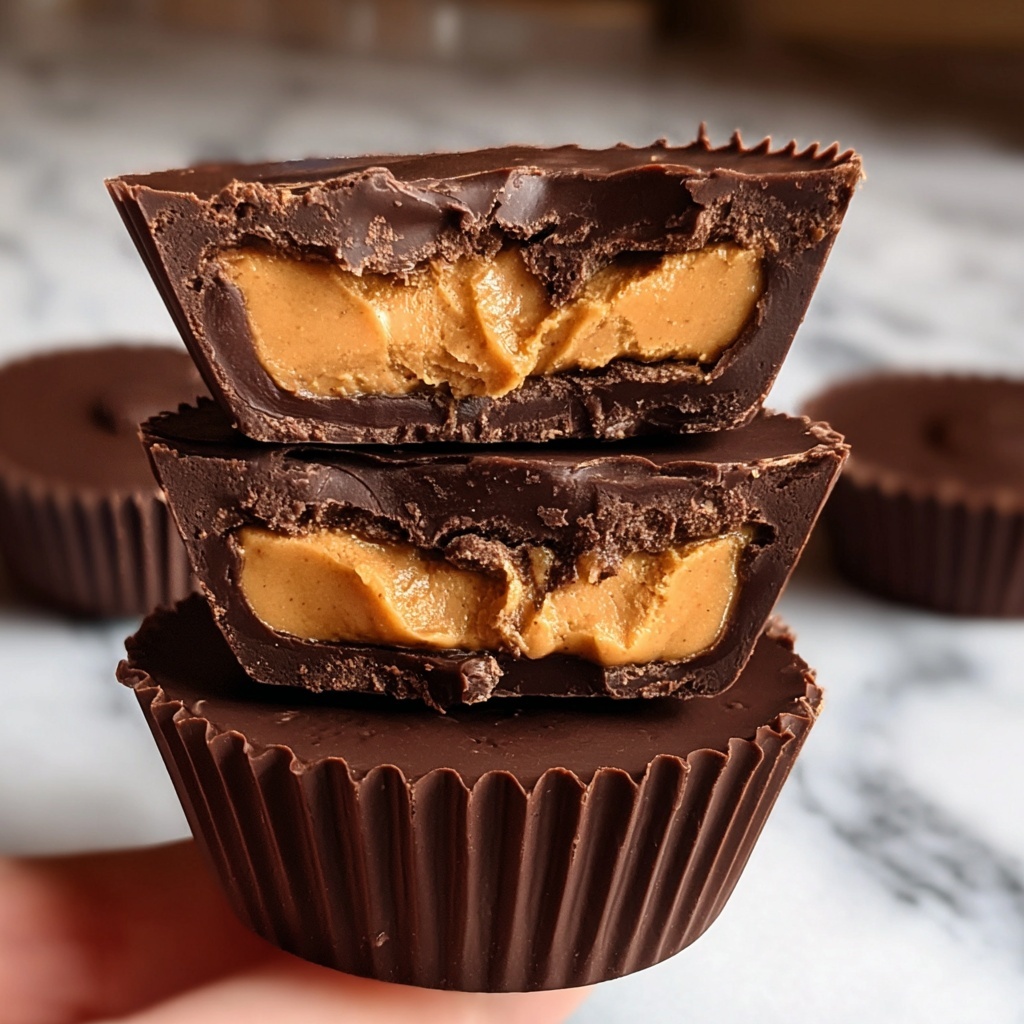
If you are a peanut butter and chocolate lover looking for a healthy treat that feels indulgent but fuels your body, the Protein Peanut Butter Cups Recipe is about to become your new best friend. This delightfully simple dessert combines creamy peanut butter with rich dark chocolate and a boost of protein powder, creating a snack that satisfies sweet cravings and supports your nutritional goals. Whether you need a post-workout bite or a guilt-free dessert, these homemade peanut butter cups will quickly win your heart and your taste buds.
Ingredients You’ll Need
These ingredients are wonderfully straightforward but each one plays a crucial role in building the perfect Protein Peanut Butter Cups Recipe. From luscious dark chocolate to smooth peanut butter and creamy protein powder, every component adds flavor, texture, or that perfect hint of sweetness.
- Dark chocolate chips: Use high-quality dark chocolate for a rich, slightly bitter base that balances the sweetness.
- Coconut oil: Helps melt the chocolate smoothly and gives a subtle tropical hint while keeping the texture silky.
- Natural peanut butter: Choose creamy, unsweetened peanut butter for an authentic nutty taste without extra sugars.
- Protein powder (vanilla or chocolate): Adds a powerful protein boost while complementing the chocolate and peanut flavors perfectly.
- Maple syrup: A natural sweetener that enhances taste without overpowering the other ingredients.
- Sea salt: Sprinkled on top to add a savory contrast that makes the chocolate and peanut butter pop.
How to Make Protein Peanut Butter Cups Recipe
Step 1: Melt the Chocolate
Begin by gently melting the dark chocolate chips and coconut oil together until you have a glossy, smooth mixture. This molten chocolate forms the delicious base and top layer of your peanut butter cups, so take your time to keep it silky without burning.
Step 2: Prepare the Chocolate Base
Line a muffin tin with paper liners to keep things neat and easy to pop out later. Spoon a small amount of your melted chocolate into each liner, creating a thin but solid base. Then, place the tin in the freezer to set—this helps your cups stay firm and gives a nice crunch when you bite into them.
Step 3: Mix the Peanut Butter Filling
While the chocolate base chills, combine the natural peanut butter, protein powder, and maple syrup in a bowl. Stir until you get a thick but spreadable filling that’s packed with flavor and protein, balancing creaminess and sweetness beautifully.
Step 4: Assemble the Cups
Once the chocolate bases are set, spoon the peanut butter mixture onto each one, filling them up to just below the rim. Smooth the tops gently for an even layer—you want a perfect peanut butter center encased in chocolate.
Step 5: Top with Chocolate and Freeze
Pour the remaining melted chocolate over the peanut butter filling, making sure each cup is fully sealed with a chocolate layer. Sprinkle a pinch of sea salt on top of each one for that extra flavor kick, then freeze the whole tray until the cups are firm and ready to enjoy.
Step 6: Enjoy!
Remove your Protein Peanut Butter Cups from the freezer and relish this incredible snack that’s as nourishing as it is delicious. These treats are perfect for satisfying your sweet tooth while keeping your nutrition on track.
How to Serve Protein Peanut Butter Cups Recipe
Garnishes
For a little extra flair, dust your peanut butter cups with a sprinkle of cocoa powder or finely chopped nuts. You can also add a few chocolate shavings or a light drizzle of melted peanut butter on top for that gourmet touch that makes every bite unforgettable.
Side Dishes
Serve these cups alongside a smoothie bowl or fresh fruit for a balanced snack. The richness of the peanut butter cups pairs beautifully with refreshing berries or sliced apples, creating a combination that’s both satisfying and vibrant in flavor.
Creative Ways to Present
Try placing your Protein Peanut Butter Cups Recipe on decorative mini plates or inside fancy cupcake wrappers when serving guests. They also make charming gifts when packaged in small boxes tied with a ribbon—an irresistible homemade treat anyone would adore.
Make Ahead and Storage
Storing Leftovers
Keep leftover peanut butter cups in an airtight container in the refrigerator to maintain their firmness and freshness. Stored this way, they will stay delicious for up to one week, making it easy to grab a healthy snack anytime.
Freezing
For longer storage, freeze your peanut butter cups in a sealed container with parchment paper separating the layers. Frozen, they can last for up to one month and can be enjoyed straight from the freezer for a chilly, satisfying treat.
Reheating
Generally, these peanut butter cups are best eaten chilled or frozen, but if you prefer a softer texture, let them sit at room temperature for 10 minutes before eating. Avoid microwaving as it can cause the chocolate to melt unevenly and lose its delightful snap.
FAQs
Can I use any type of protein powder?
Yes, you can use vanilla or chocolate protein powder depending on your preference. Just ensure it’s a powder that mixes well without clumping to keep the filling smooth.
Is natural peanut butter important for this recipe?
Natural peanut butter is best because it contains fewer additives and sugar, allowing the true nutty flavor to shine and keeping the cups healthier overall.
Can I substitute maple syrup with another sweetener?
Absolutely! Honey or agave syrup are great alternatives that will also provide a natural sweetness, though the flavor might be slightly different.
How long does it take for the peanut butter cups to set in the freezer?
It usually takes about 30 minutes to an hour for the cups to firm up completely, depending on your freezer’s temperature. Just make sure they are fully solid before enjoying.
Are these peanut butter cups suitable for meal prep?
Yes! Thanks to the protein boost and balanced ingredients, they make a fantastic meal prep snack or dessert to keep your energy up throughout the week.
Final Thoughts
Making your own Protein Peanut Butter Cups Recipe is a rewarding experience that combines simple ingredients with a touch of kitchen magic to create a snack that’s both indulgent and nourishing. I can’t wait for you to try this recipe and enjoy every bite as much as I do—trust me, once you’ve made these, store-bought peanut butter cups will feel like a distant memory!
Print
Protein Peanut Butter Cups Recipe
- Prep Time: 15 minutes
- Cook Time: 10 minutes (melting and assembly)
- Total Time: 55 minutes (including freezing time)
- Yield: 12 servings
- Category: Dessert
- Method: No-Cook
- Cuisine: American
- Diet: Low Fat
Description
These homemade Protein Peanut Butter Cups are a delicious and nutritious twist on the classic treat, combining rich dark chocolate with a protein-packed peanut butter filling. Perfect for a post-workout snack or a healthier dessert option, they offer a satisfying blend of flavors and textures with just the right amount of sweetness.
Ingredients
Chocolate Base
- 1 cup dark chocolate chips
- 1 tablespoon coconut oil
Peanut Butter Filling
- 1/2 cup natural peanut butter
- 1 scoop protein powder (vanilla or chocolate)
- 2 tablespoons maple syrup
Topping
- Sea salt, for sprinkling
Instructions
- Melt the chocolate. In a heatproof bowl, gently melt the dark chocolate chips together with the coconut oil until smooth, either using a double boiler or short bursts in the microwave, stirring frequently to prevent burning.
- Prepare the chocolate base. Line a muffin tin with paper liners and spoon a small amount of the melted chocolate into each liner to form the base layer. Spread it evenly and place the muffin tin in the freezer to allow the chocolate to set firmly.
- Make the peanut butter filling. While the base sets, mix the natural peanut butter, protein powder, and maple syrup together in a bowl until smooth and well combined to create a creamy filling.
- Assemble the cups. Once the chocolate base is firm, spoon the peanut butter filling evenly on top of each chocolate base in the muffin tin.
- Top with chocolate and salt. Spoon the remaining melted chocolate over the peanut butter layer to cover it completely. Sprinkle a pinch of sea salt on top of each cup for an added flavor contrast.
- Freeze until firm. Place the muffin tin back into the freezer and chill for at least 30 minutes or until the peanut butter cups are fully set and firm.
- Serve and enjoy. Remove the peanut butter cups from the muffin liners and enjoy your homemade protein-packed treat straight from the freezer or at room temperature.
Notes
- Use high-quality dark chocolate chips for the best flavor and meltability.
- You can substitute maple syrup for honey or agave syrup if preferred.
- Keep the peanut butter cups stored in the freezer or refrigerator to maintain firmness.
- To make it vegan, ensure your protein powder is plant-based and use vegan dark chocolate chips.
- If you want a stronger chocolate flavor, use a cocoa powder along with the protein powder in the filling.
