
If you’ve been searching for that perfect blend of crunchy, creamy, and savory all wrapped up in a Mediterranean delight, look no further than this Crispy Pita with Chicken Feta Recipe. It’s a dish that delivers a satisfying crunch from the toasted pita, coupled with a luscious filling of tender chicken and tangy feta, brightened up by fresh veggies and herbs. Perfect for a quick lunch or a light dinner, this recipe brings together simple ingredients in a way that feels both comforting and fresh — truly a go-to that you’ll want to make again and again.

Ingredients You’ll Need
The magic of this Crispy Pita with Chicken Feta Recipe lies in its straightforward yet thoughtfully paired ingredients. Each item plays a vital role, from the creamy Greek yogurt that binds the filling to the crisp cucumber that adds refreshing crunch, balancing textures and flavors beautifully.
- 4 pita breads (halved or opened into pockets): The essential base, offering the perfect crispy texture once toasted.
- 2 cups cooked shredded or chopped chicken breast: Adds protein-packed heartiness and mild flavor.
- 1 cup crumbled feta cheese: Brings a tangy, salty creaminess that complements the chicken.
- ½ cup plain Greek yogurt: Acts as a smooth binder with a subtle tanginess.
- 1 tablespoon olive oil: Used for brushing pita, it ensures a golden crisp with a rich bite.
- 1 tablespoon lemon juice: Adds zesty brightness to lift the flavors.
- 1 teaspoon dried oregano: Infuses that signature Mediterranean herbal note.
- 1 garlic clove (minced): Gives a punch of savory depth without overpowering.
- 1 cup diced cucumber: Provides fresh crunch and cool contrast.
- 1 cup diced tomato: Offers juicy sweetness and color.
- ¼ cup thinly sliced red onion: Adds a subtle bite and sharpness.
- Salt and black pepper to taste: Essential seasonings to tie everything together.
- Fresh parsley or mint for garnish (optional): A delightful herbal finish that elevates each bite.
How to Make Crispy Pita with Chicken Feta Recipe
Step 1: Prepare and Toast the Pita
Start by preheating your oven to 400°F. Brush both sides of the pita halves generously with olive oil to ensure they crisp up perfectly. Lay them on a baking sheet and bake them for 6 to 8 minutes, flipping halfway through to get an even golden crunch on both sides. The warm, crispy pita is the foundation that brings texture and flavor to this whole dish.
Step 2: Combine the Chicken and Feta Filling
While your pita crisps up, mix the shredded chicken with crumbled feta, plain Greek yogurt, lemon juice, dried oregano, and minced garlic in a bowl. Season with salt and freshly ground black pepper. Stir everything together until you have a creamy, well-blended mixture that’s bursting with Mediterranean flavors. This creamy filling makes every bite satisfying and rich.
Step 3: Prepare the Fresh Vegetable Topping
In a separate bowl, toss together the diced cucumber, diced tomato, and thinly sliced red onion. This fresh, crisp mixture adds a perfect counterpoint to the rich chicken-feta blend and makes each bite feel bright and refreshing.
Step 4: Assemble Your Crispy Pita with Chicken Feta Recipe
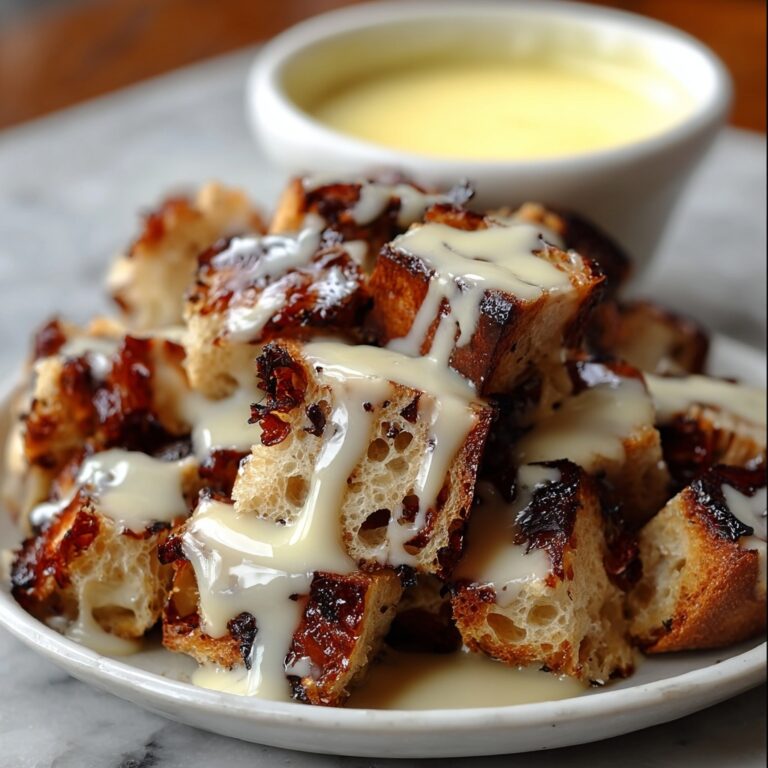
Once the pita breads are crisp and golden, fill each half-pocket with a generous scoop of the chicken and feta mixture. Top with the fresh vegetable medley, and don’t forget to sprinkle some fresh parsley or mint if you’re feeling fancy. Serve immediately for the best contrast between warm, crunchy pita and cool, creamy filling.
How to Serve Crispy Pita with Chicken Feta Recipe

Garnishes
Add fresh parsley or mint leaves right before serving to introduce a fragrant herbal note that pairs wonderfully with the tangy feta and bright lemon. A little extra drizzle of olive oil or a squeeze of fresh lemon juice on top can elevate the flavors even more.
Side Dishes
This dish stands strong on its own but pairs beautifully with light sides. Consider a crisp green salad with a lemon vinaigrette or a small bowl of tzatziki sauce for extra creaminess. Roasted vegetables or a simple bowl of olives would also complement the Mediterranean vibe perfectly.
Creative Ways to Present
Want to switch things up? Use whole pita breads as mini pizzas by spreading the chicken and feta mix evenly, then baking until warmed through. Alternatively, turn this into a vibrant picnic dish by assembling the filling separately and stuffing pita just before eating to keep everything crisp and fresh.
Make Ahead and Storage
Storing Leftovers
Place any leftover chicken and feta filling in an airtight container and refrigerate for up to 2 days. Keep the toasted pita separate to maintain its crunch. When you’re ready to eat, stuff the pita with the chilled filling or warm the filling slightly if you prefer it warm.
Freezing
If you want to freeze the filling, do so in a freezer-safe container for up to 1 month, but avoid freezing the pita to prevent sogginess. Thaw the filling overnight in the refrigerator before reheating or serving cold.
Reheating
Reheat the chicken and feta filling gently in a microwave or on the stovetop until just warm. Toast the pita again briefly in the oven or toaster oven to refresh its crispiness before assembling your Crispy Pita with Chicken Feta Recipe again.
FAQs
Can I use other types of cheese instead of feta?
Absolutely! While feta adds a distinctive tangy creaminess, good alternatives include goat cheese for a similar tang or ricotta for a milder, softer texture. Just keep the saltiness and moisture level in mind to avoid soggy pita.
Is this recipe suitable for meal prepping?
Yes, the chicken and feta filling can be prepped ahead and stored in the fridge for a couple of days. Just keep the pita separate and assemble right before eating to preserve that delicious crisp texture.
Can I add other vegetables or ingredients?
Definitely! Feel free to toss in diced bell peppers, olives, or even a handful of arugula for extra flavor and crunch. This recipe is wonderfully flexible and welcomes colorful additions.
What type of pita works best?
Flat pita breads or ones that can be halved into pockets both work well. Thinner pita crisps nicely in the oven, offering the perfect crunch, while pocket pita gives a sturdy vessel to stuff generously.
How do I make sure the pita stays crispy when serving?
To maintain the crispiness, assemble the filling just before serving rather than making the sandwiches far in advance. If transporting, keep the components separate and combine at the last minute.
Final Thoughts
This Crispy Pita with Chicken Feta Recipe is a testament to how simple ingredients can transform into something truly special and satisfying. Whether you’re craving a speedy lunch or something light yet flavorful for dinner, this dish hits all the right notes. Give it a try — I promise it’ll become one of your favorite easy Mediterranean meals to whip up and share with loved ones!
Print
Crispy Pita with Chicken Feta Recipe
- Prep Time: 15 minutes
- Cook Time: 10 minutes
- Total Time: 25 minutes
- Yield: 4 servings
- Category: Main Course
- Method: Baking
- Cuisine: Mediterranean
Description
Enjoy a Mediterranean-inspired Crispy Pita with Chicken Feta, featuring warm, golden baked pita pockets filled with a creamy mixture of shredded chicken, tangy feta, Greek yogurt, and fresh herbs, topped with a refreshing diced cucumber and tomato salad for a healthy, satisfying meal perfect for lunch or dinner.
Ingredients
Pita and Toppings
- 4 pita breads (halved or opened into pockets)
- 1 cup diced cucumber
- 1 cup diced tomato
- ¼ cup thinly sliced red onion
- Fresh parsley or mint for garnish (optional)
Chicken Feta Filling
- 2 cups cooked shredded or chopped chicken breast
- 1 cup crumbled feta cheese
- ½ cup plain Greek yogurt
- 1 tablespoon lemon juice
- 1 teaspoon dried oregano
- 1 garlic clove (minced)
- Salt and black pepper to taste
Other Ingredients
- 1 tablespoon olive oil
Instructions
- Preheat the Oven: Set your oven to 400°F (200°C) to prepare for crisping the pita breads evenly.
- Prepare the Pitas: Brush both sides of each pita half with olive oil to help achieve a golden, crispy texture when baked. Arrange them on a baking sheet in a single layer for even cooking.
- Bake the Pitas: Place the baking sheet in the preheated oven and bake for 6–8 minutes. Flip the pita halves halfway through the baking time to ensure both sides become crisp and golden brown.
- Make the Chicken Feta Mixture: In a bowl, combine the cooked shredded chicken, crumbled feta cheese, Greek yogurt, lemon juice, dried oregano, minced garlic, salt, and black pepper. Stir thoroughly until the mixture is creamy and well blended.
- Prepare the Fresh Vegetable Topping: In a separate small bowl, mix together the diced cucumber, tomato, and thinly sliced red onion. Set aside for topping later.
- Assemble the Pitas: Once the pita breads are crispy and warm, spoon generous amounts of the chicken and feta mixture into each pita half (or spread on whole pitas if preferred). Then top with the fresh vegetable mixture.
- Garnish and Serve: Add a sprig of fresh parsley or mint to each pita for a burst of color and flavor, then serve immediately to enjoy the warm, crispy texture paired with the creamy chicken filling.
Notes
- Use store-bought rotisserie chicken to save time and add extra flavor.
- For an enhanced taste, warm the chicken mixture slightly before assembling.
- This recipe works well as a pita pizza: spread the mixture over whole pitas and bake until heated through.


